 When this recipe was chosen, I couldn't be more excited. As far as desserts go, I don't think you can find one healthier and quicker to prepare than this one. I missed the deadline, but I just had to make this. I quartered the recipe because when it comes to spoon desserts I can eat embarassingly large amounts. I wouldn't mind drinking 2 1/4 cups of milk, but eating 4 eggs is a little too much. Since I only ended up with 2 6 oz ramekins, I didn't want to bake them in the oven so I steamed them instead. Once my pot of water boiled, I turned the heat down to medium and put the ramekins inside the pot. Having never steamed eggs before, I think I may have oversteamed. The first custard cups I made were really flan-like and eggy, just like most described they were on the P&Q. Since I didn't make the original recipe, I can't complain!
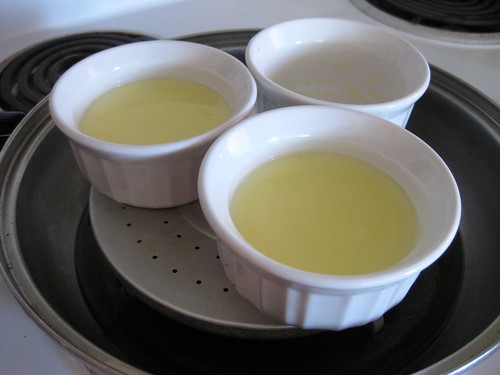
I really wanted this to work because I love custard desserts so I tried it again. This time, my mom suggested I add more milk and take them out after 7 minutes. I tried it her way and it worked! These were really smooth and not 'tight'..as in I didn't have to jam my spoon in or as eggy. I think the best part was the texture, but since the ingredients are your basic egg, milk and sugar, it wasn't very rich (but at least it wasn't eggy!). I really enjoyed the steamed version because it was really quick and easy. The only cooking part is steaming for 7 minutes because you don't have to heat the milk as long as everything is at room temperature. Plus, if you mess up, it's only an egg, 3/4 cup milk, and 1.5 tbsp sugar. I couldn't wait for pictures and dug into one while it was still warm.. so just pretend the third ramekin is filled. Actually, when my mom makes it, we usually eat it plain like this without flavouring and warm instead of chilling it in the fridge. I have a feeling most people won't find this rich enough, but I really liked the lightness!
Steamed Custard Cups
My mom's version
makes 3 6 oz ramekins
1 egg, room temperature
1.5 tbsp sugar (or more if you like it sweeter, but I like mine subtly sweet)
3/4 cup milk, room temperature
Boil half a saucepan of water at medium heat.
Whisk egg and sugar together.
Gradually add milk while whisking to ensure suggar is dissolved.
Spoon foam away
Pour egg mixture into ramekins.
Put ramekins into pot for steaming and put a lid on top.
After 7 minutes, take custards out (time depends on size of pot, ramekins and stove). It will be jiggly and you might think it's not cooked, but just take it out when a chopstick inserted comes out clean. It will settle once it cools.
Thanks to Bridget of The way the cookie crumbles for choosing this recipe, which can be found on her blog and here. Don't forget to visit the TWD Blogroll!
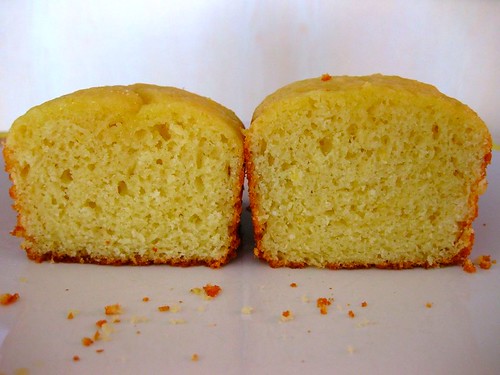
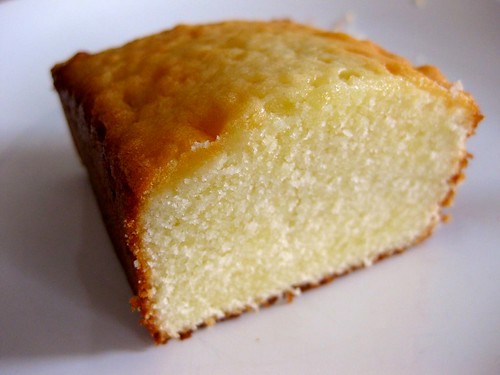 This was one delicious pound cake! I have nothing to compare it to because I've never made a pound cake before, but this one reminded me of a Sara Lee minus the chemicals. If I didn't have a carton of whipping cream that was about to expire, I probably wouldn't have made this. The texture of this was everything I ever wanted in a pound cake. Dense and compact, but very tender and melt in your mouth. I don't think I've eaten a softer cake..I guess it makes sense when there's a cup each of butter and heavy cream! Of course, I just couldn't make this recipe without wondering why the batter had to be mixed 5 mins after everything was added! What a way to make me all paranoid about overmixing. I read a lot of reviews, secretly hoping that someone would say the 5 mins of the mixer running on medium high speed was wrong. Instead, most people just raved about this cake so I decided to see for myself the difference between making this the way it was written and the way we're generally used to by stopping the mixer after everything was incorporated.
I made 2/3rds of the recipe because I had a feeling I didn't have enough mini pans. I didn't want to bake leftover batter in a muffin tin either because that would mean having to open the oven door during baking. I also made a few modifications, reducing the egg to 6 to make the recipe easier to divide, the sugar from 3 cups to 2 because many reviewers complained about it being too sweet and upped the salt to 1 tsp because 3/4 tsp seemed too little for a cake with that much sugar and flour. Since there is no leavener in this cake, the butter, sugar and eggs have to be beaten until they're really fluffy and well incorporated or else it won't rise properly. After all the ingredients were added, the flour disappeared and the batter looked homogenous I stopped the machine and filled my first two minipans with 4 1/4 cup scoops each. Next (for the remaining batter) I turned the mixer on medium high for a very long 5 minutes. When all the beating was done, I filled my next two pans with 4 1/4 cup scoops each and put all 4 pans in a cold oven.

Left: beating for 5 minutes on medium high; Right: beating until flour disappeared and batter looked homogeneous
The cake that was whipped for 5 minutes had a nicer exterior and rose higher, but when it came to the texture, the cake that I mixed just until the flour disappeared was more delicate and tender. It also didn't have the occasional tunnel that was found in the loaves whipped for 5 minutes. I guess when they say don't overmix, you really shouldn't over mix.. even when the recipe says the secret is overmixing! Next time I make this I'm going to try it with a preheated oven or maybe a little bit of baking powder for a better lift (I can't decide which yet). Despite it's melt in your mouth and very tender crumb it was the slightest bit too dense the next day. I also want to try Cook's Illustrated's pound cake, which doesn't have any cream...but a lot of butter! Since I made changes, it wouldn't be fair for me to review the original recipe. I was really just trying to see the difference in the 5 minute beating at the end. Also, 2/3rds of the recipe fit perfectly in 4 mini loaf pans using a 1/4 cup icecream scoop.
Elvis Presley's Whipping Cream Pound Cake
Epicurious
Ingredients
2 sticks (1 cup) unsalted butter, softened, plus additional for buttering pan
3 cups sifted cake flour (not self-rising; sift before measuring) plus additional for dusting
3/4 teaspoon salt (I used 1 tsp)
3 cups sugar (I used 2 cups)
7 large eggs, at room temperature 30 minutes (I used 6 eggs)
2 teaspoons vanilla
1 cup heavy cream
Special equipment: a 10-inch tube pan (4 1/2 inches deep; not with a removable bottom) or a 10-inch bundt pan (3 1/4 inches deep; 3-qt capacity) (I used 4 mini loaf pans for 2/3rds of the recipe)
Put oven rack in middle position, but do not preheat oven.
Generously butter pan and dust with flour, knocking out excess flour.
Sift together sifted flour (3 cups) and salt into a bowl. Repeat sifting into another bowl (flour will have been sifted 3 times total).
Beat together butter (2 sticks) and sugar in a large bowl with an electric mixer at medium-high speed until pale and fluffy, about 5 minutes in a stand mixer fitted with paddle attachment or 6 to 8 minutes with a handheld mixer. Add eggs 1 at a time, beating well after each addition, then beat in vanilla. (Make sure the eggs are beaten in very well) Reduce speed to low and add half of flour, then all of cream, then remaining flour, mixing well after each addition (I did this in 3 additions starting with flour - cream - flour - cream - flour). Scrape down side of bowl, then beat at medium-high speed 5 minutes (I prefer to stop the machine after the flour is incorporated and the batter looks homogenous). Batter will become creamier and satiny.
Spoon batter into pan and rap pan against work surface once or twice to eliminate air bubbles. Place pan in (cold) oven and turn oven temperature to 350°F. Bake until golden and a wooden pick or skewer inserted in middle of cake comes out with a few crumbs adhering, 1 to 1 1/4 hours. Cool cake in pan on a rack 30 minutes (I only cooled in the pan for 10 minutes). Run a thin knife around inner and outer edges of cake, then invert rack over pan and invert cake onto rack to cool completely.
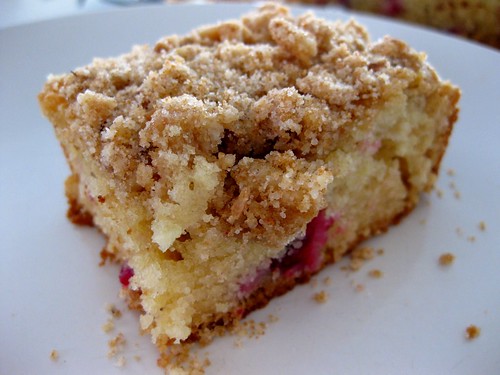 I was so excited when this recipe was chosen because it finally gave me the excuse to make a crumb cake! I've bookmarked so many, but never got to making any of them because there was always something else I had to try instead. Plus, I was a little worried about the crumb topping turning all soggy on me. I was kind of rushed when I was making this and somehow I poured 3/4 cup of buttermilk after reading 1/2 cup. Luckily the batter was so thick and it all worked out in the end! Also, cranberries have less moisture than blueberries so I guess the extra liquid was ok. I omitted the spices and added 1/4 tsp of almond extract. The combination of cranberries and almond was really nice and next time I'm going to add more of each, since you can't even tell I added cranberries along with a dash of cinnamon. The sourness of the cranberries helped to cut some of the sweetness in the topping, which was a really nice contrast! I loved making this because I love cake batter, not uncooked though, just looking at how incredibly smooth and creamy it is. Umm the truth is.. I'm not a batter licker and it's not because of the raw eggs, but the raw flour. Maybe it just brings back childhood nightmares about oatmeal or cream of wheat..haha. I threw all the crumb ingredients together (minus 2 tablespoons of butter and brown sugar, which I added at the end because I forgot) in the stand mixer and mixed it using the paddle attachment because I was too lazy to clean the food processor. The only problem was I was left with something that looked more like wet sand than coarse crumbs. I had a feeling my sand would just melt into the batter so I squeezed a handful of it and dropped it on top to form as many large clumps as possible. The crumb topping was a hit and dangerously addicting!
Thanks to Sihan of Befuddlement for choosing this recipe! The recipe can be found on her blog and here. Don't forget to visit the TWD Blogroll!
 Since the French Yogurt cake got such amazing raves, I decided to give it another shot. I whisked the oil in beforehand with the eggs and sugar to skip the folding step at the end so that the cake would be more tender and less greasy. This time I just had to make the glaze because the sticky topping looked just too good! I used Greek Yogurt instead of 2%... anything higher can be pretty hard to find. I also reduced the baking powder to 1/2 tsp for 2/3rds of the recipe (3/4 tsp for a whole recipe) to get a tighter crumb. Instead of 2 mini loaves, I got 9 muffins. A muffin is actually pretty big when you consider that it's about 1/4th of a mini loaf. I don`t think I usually eat one fourth of a mini loaf as one serving (at least not when I'm making pound cake!). These were a little softer and not as coarse, but something still feels like it's missing and I think it's butter...haha. I brought the rest to school because I didn't think we could finish them. I was suprised when my friends told me they weren't as bad as I described they would be. I searched for some yogurt cakes made with butter and I saw this one at Canelle et Vanille that looked really good!
Thanks to Liliana of My Cookbook Addiction for choosing this recipe. The recipe can be found on her site and here. Don't forget to visit the TWD Blogroll!
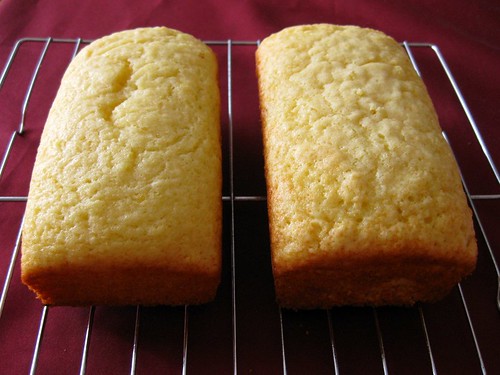 I've wanted to bake a French yogurt cake for the longest time, but never got to it because I couldn't decide which recipe to choose (how typical...haha). Every recipe I found called for folding in the oil in the last step, which seemed kind of different from most cake recipes (non yogurt). Could it be a crucial step to making yogurt cakes and provide some improvement in texture that can benefit other oil based cakes as well? I just couldn't resist making this cake the way it was written (loaf #1) as well as whisking the eggs and sugar and then whisking in the oil until they were completely combined (loaf #2) to see if there would be a difference. Luckily, this recipe was easy to divide in 3's so I made 1/3rd of the recipe for each mini loaf pan and weighed everything to be as fair as possible.
Left: folding in oil at end; Right: whisking in oil with eggs and sugar
Loaf #2 rose slightly higher and was more pebbly on the surface than loaf #1. Loaf #1 was also denser, chewier and greasier (almost like a Costco muffin kind of way) while loaf #2 was slightly more tender and ligher. Judging by the P&Q, I think I'm in the minority with this one because I wasn't too crazy about the French yogurt cake. It was a little too springy, dense and low fat tasting for me. I'll probably make the glaze next time to get the full effect and use the method for loaf #2 (whisk the oil in beforehand with the eggs and sugar). That way, we won't have to worry about overmixing or greasiness. I actually liked the cake a little better the next day flavourwise, however, the differences were even more noticeable and loaf #1 was drier and became even denser. I think it's so cool how the same amount of fat, but added differently can affect moistness and texture.
Thanks to Liliana of My Cookbook Addiction for choosing this recipe. The recipe can be found on her site and here. Don't forget to visit the TWD Blogroll!
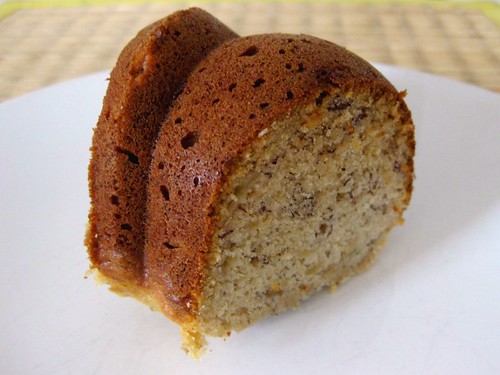 We were cleaning out the basement freezer and to my suprise, there were frozen bananas! I can't believe it's my fourth banana bread post (I made it here - CI's version, here - lower fat and here - with chocolate chips). Seriously, can anyone ever have too much banana bread?! A while ago, I saw a recipe for banana bread from the Silver Palate Cookbook that I wanted to try because compared to others I've tried, there was no added liquid (milk, buttermilk, sour cream, yogurt). When you consider how much banana is used, I guess more liquid isn't reallly necessary.
This banana bread was really delicious! The texture was soft and light compared to CI's version. It may have been a little too light for banana bread standards, but that's because while the butter, sugar and eggs were creaming, I was trying to multitask by doing dishes at the same time and left the mixer running a lot longer than usual. If you're into dense and chewy, I would try this recipe using the muffin method by melting the butter instead of creaming (or just not overcream like me..haha) because the flavour was amazing!. Doesn't it feel like sometimes that no matter how much banana is added the flavour is still weak, but at the same time adding more banana might turn the bread into mush? I love strong banana flavour, but when there are equal or more cups of banana then flour, it starts feeling gummy to me. I think the yogurt in my previous go-to recipe from CI mutes the flavour of the bananas and makes the batter too wet. The best part about this recipe was not having to wait for the centre to cook while sacrificing the rest of the loaf although I would have to bake this in a loaf pan to be sure (need Goldtouch now!). Bundt pans have way more surface area and allow for even baking. My favourite are the ones from Nordicware, which are just so heavy sometimes I feel like I might drop my cake while I'm pulling it out from my oven.
The only question is, how much banana is in 3 bananas? Mine came to 1 1/4 cup. Since that was close to the 1 1/2 cup in CI's recipe, I didn't bother adding another banana. I don't think I would use less than 1 1/4 cup of bananas though or else it probably won't be flavourful enough. There are still 3 frozen bananas left. Maybe next time I'll be confident enough to break into a bag of whole wheat flour, we'll see...
Silver Palate Cookbook Banana Bread: (makes 1 loaf)
8 T unsalted butter, room temp
3/4 c granulated sugar
2 eggs
1 c unbleached all-purpose flour
1 t baking soda
1/2 t salt
1 c whole wheat flour (I used all purpose)
3 large ripe bananas, mashed (1 1/4 cups - 1 1/2 cups)
1 t vanilla extract
1/2 c walnuts, coarsely chopped (I omitted)
1. Preheat oven to 350. Grease 9 x 5 x 3 inch loaf pan. (I used a bundt pan)
2. Mix flour, soda, salt together
3. Mash bananas with a fork, add vanilla to the banana mixture.
4. Cream butter and sugar together until fluffy. Add eggs, one at a time and beat.
5. Alternately add dry and wet ingredients to butter mixture, beginning and ending with the dry (dry-wet-dry-wet-dry)
6. Pour into pan. Bake 50-60 min, or until cake tester comes out clean (I look for a few mini moist crumbs). Cool in pan 10 min, then on rack.
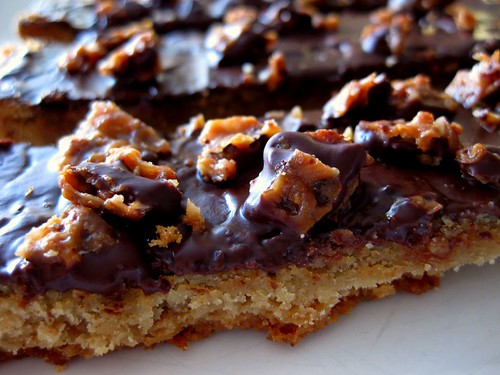 Finally, these were baked and posted! I was going to skip this, but then when I was swamped with tests to study for, I decided that making cookie dough was more fun. I put the dough in the freezer and it sort of just stayed there until now..haha. I halved the recipe, but I think I really should have made 2/3rds of it because as the dough was coming together I was starting to realize that there was no way it could fit in my 9 inch pan without being paper thin. I considered turning them into cookies, but then I decided to use a 9x5 loaf pan. I only used 1/2 the cinnamon (1/8th since I halved) because I was afraid it would mask the coffee flavour. I chopped up some Lacey's we still had leftover from Christmas and reduced the butter to 3/4 cup (1/4 cup + 2 tbsp since I halved) because 1 cup of butter to 1.5 cups of flour seemed like a lot! Plus, the bubbly percolating and puckering Dorie mentioned made me feel like this cookie was swimming in butter. Overall, the texture of these bars were perfect. Crunchy, crumbly with the slightest chew. I'm not a crazy cinnamon fan so I'll omit it next time, but will double up on instant coffee for extra coffee flavour!
Thanks to Whitney of What's left on the table for choosing this recipe, which can be found on her blog and here. Don't forget to check out the TWD blogroll!