 Making this cake was a lot harder than I expected. The baking part was easy, trying to decide which chocolate recipe to use...well... that was more difficult than it should've been. Originally, I was going to make the Chocolate Peanut Butter Cake after seeing it on Smitten Kitchen. The only problem was, after I scanned through the recipe, I noticed that there was only 1/2 cup of cocoa for 2 cups of flour and a lot of liquid. I can't stand it when there's only a hint of chocolate flavour in chocolate cakes. Deb also said in her comments section that this cake wasn't as chocolatey compared to others. Still, the pairing of peanut butter cream cheese frosting + chocolate was too good too pass so I searched for another cake recipe. The only problem was that everyone claimed to have the 'best' version. I narrowed it down to only butter based because I find that the crumb seems finer than oil based cakes, which are coarser. I also prefer cakes made with both cocoa and chocolate because without the actual chocolate, it seems like that extra decadence and depth of flavour is missing. At the same time I had to make sure I didn't cross into brownie territory with the richness.
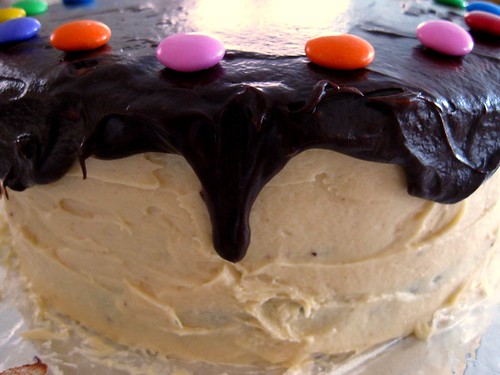
I decided to make the chocolate cake from CI's chocolate blackout cake. This is a cocoa based recipe, but I wanted to try it because it was a little different. The cocoa was heated and everything was done in one pot with a whisk. I've never made a 'one bowl' cake recipe because I've always been sceptical about them. There has to be a reason why we have to cream butter and sugar or ribbon eggs and sugar together...right? Plus, what if I'm not a good whisker!! Being a huge peanut butter lover, I was a little disappointed when I didn't like the frosting. There was just a little too much going on for me with the tanginess, saltiness and sweetness. The cake was moist and a little fudgy + dense, although that's not suprising because the butter was melted and everything was whisked by hand. I think it might have benefitted from some melted chocolate, although heating the cocoa defintely brought out more flavour. Overall, the cake part was good, but not the best chocolate cake I've eaten.

Chocolate Blackout Cake
Cook's Country
8 tablespoons unsalted butter (1 stick), plus extra for greasing pans
1 1/2 cups all-purpose flour , plus extra for dusting pans
2 teaspoons baking powder
1/2 teaspoon baking soda
1/2 teaspoon Table salt
3/4 cup Dutch-processed cocoa powder
1 cup strong black coffee
1 cup buttermilk
1 cup packed light brown sugar (I used 3/4 cup)
1 cup granulated sugar (I used 3/4 cup)
2 large eggs
1 teaspoon vanilla extract
Instructions
1. For the cake layers: Adjust oven rack to middle position and heat oven to 325 degrees. Butter and flour two 8-inch cake pans (I used 3 8 inch pans because I didn't not crumble one layer). Whisk flour, baking powder, baking soda, and salt in bowl.
2. Melt butter in large saucepan over medium heat. Stir in cocoa and cook until fragrant, about 1 minute. Off heat, whisk in coffee, buttermilk, and sugars until dissolved. Whisk in eggs and vanilla, then slowly whisk in flour mixture.
3. Divide batter evenly between prepared pans and bake until toothpick inserted in center comes out clean, 30 to 35 minutes. Cool layers in pans 15 minutes, then invert onto wire rack. Cool to room temperature, at least 1 hour.
(This cake is originally written to be a chocolate blackout cake, so that's why 2 8 inch pans were used to get 4 layers. I didn't crumble one layer for my cake so I divided the batter into 3 8 inch pans to get 3 layers)
Peanut Butter Frosting
Makes about 5 cups
10 ounces cream cheese, at room temperature
1 stick (4 ounces) unsalted butter, at room temperature
5 cups confectioners’ sugar, sifted
2/3 cup smooth peanut butter, preferably a commercial brand (because oil doesn’t separate out)
1. In a large bowl with an electric mixer, beat the cream cheese and butter until light and fluffy. Gradually add the confectioners’ sugar 1 cup at a time, mixing thoroughly after each addition and scraping down the sides of the bowl often. Continue to beat on medium speed until light and fluffy, 3 to 4 minutes.
2. Add the peanut butter and beat until thoroughly blended.
 I never thought I would start a post title with flour frosting, sounds appetizing doesn't it? Well, it is the best buttercream type frosting I've ever had, tied with SMBC (But only Cassie's version). When I first started baking from scratch, I was really disappointed with frosting because I thought that anything made with 'real' ingredients had to taste better than the fake supermarket stuff we get, but it wasn't. No matter how creamy the butter + icing sugar frosting looked in the stand mixer or piped out on a cake, I just couldn't help scraping it off. Maybe it's the icing sugar I buy or I'm just weird, but all I could feel was gritty, pasty and taste cornstarch. I tried so many versions (with water, milk, cream, part shortening + sifted like crazy), but none of them could solve the icing sugar problems I was having. Finally I gave up and moved on to SMBC. Most people who make SMBC complain that it tastes like a stick of butter..well.. because it does (unless you have the right ratio of ingredients) so I was really disappointed when that failed too. It wasn't until I accidentally halved the sugar when making a quartered version of buttercream for the DB Filbert Gateau challenge when I finally made something that tasted creamy, sweet, and not like a stick of butter! It still wasn't perfect so I went searching for a SMBC with a similar ratio of butter to sugar to egg whites.
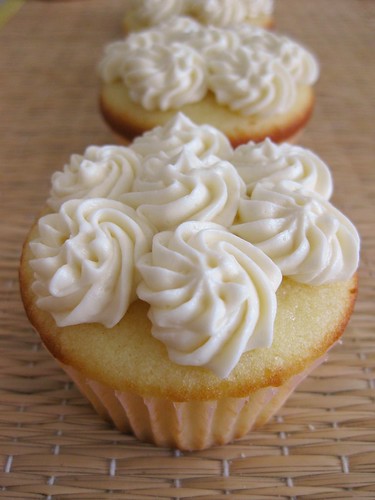
I still wanted to make frosting that tastes like the fake whipped cream stuff minus all the chemicals. Many people were saying that flour frostings taste a lot like whipped or pastry cream, but I was reluctant to try them because if I was having a problem with the tiny amounts of cornstarch in icing sugar, the thought of adding flour was grossing me out even more. Then Cassie made a flour frosting for her red velvet cupcakes and since I love her SMBC, I had to give it a try. Most of the recipes on google seemed to have the same ratio of butter, sugar and milk with flour being the only difference so I just randomly chose a recipe, but followed her directions. It didn't make sense to cream the butter and granulated sugar and then add the cooled cooked flour mixture anyway (unless if granulated sugar can somehow magically dissolve).
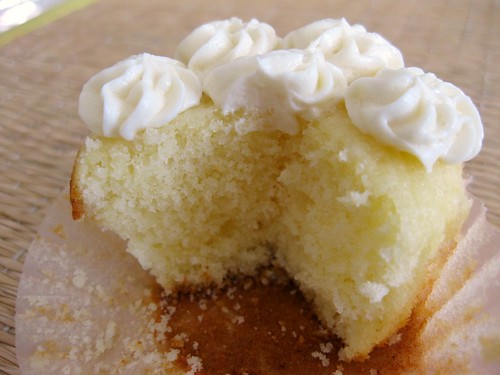
As for the cupcake, I made a modified version of Billy Billy's vanilla cupcake, but I'm going to save that for another post because it's still not perfect (grr!). If anyone's interested though, here's the recipe to Billy's cupcakes. Oh and since I was baking cupcakes I couldn't help doing a direct comparison of my muffin tins. I mentioned that the William's Sonoma Goldtouch was the best pan I've ever used, but I didn't do an actual side by side comparision. The cupcakes baked in the Wilton were drier at the edges, which was more noticeable the next day and more crumbly. By the way, has anyone used Magic Line pans? I've read some good things about them.
Flour Frosting
1/4 cup flour
1 cup sugar
1 cup milk
1 cup butter cut in cubes (My butter was cool and firm, but I could still leave an indent when I pressed my finger into it)
1 tsp vanilla
pinch of salt
1. In a medium heavy-bottomed saucepan, whisk the sugar, flour, salt together. Add the milk and cook over medium heat, whisking occasionally (I had to whisk constantly or else it started to stick and clump at the bottom) until the mixture has thickened into a paste and slightly bubbly at edges (You probably don't want it boiling because we all know how boiled milk tastes..)
2. Transfer the mixture to the bowl of an electric mixer fitted with the paddle attachment. Beat on high speed until cool. Reduce the speed to low and add the butter; beat until thoroughly incorporated. Increase the speed to medium-high and beat until the frosting is light and fluffy. If the frosting is too soft, transfer the bowl to the refrigerator to chill slightly: then beat again until it is the proper consistency.
3. Add the vanilla and continue mixing until combined.
I love this frosting, but I think it was still a tad rich and could taste a bit cleaner (although I'm being really picky here). I don't think I can reduce the butter though or it won't be stiff enough. I think I might try subbing some of the milk for water or play around with the flour amout next time.
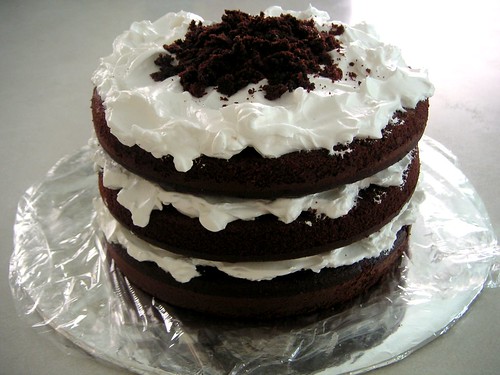 This was the first recipe I made out of Dorie's book just before I joined TWD. The cake on the cover looked so good, I just couldn't wait for someone to choose it! The frosting was a little tricky, but I really liked it because of how light tasting it was. Best of all, it wasn't cloyingly sweet like other 7 minute frostings. I baked this cake in 3 8 inch pans and used the scraps from leveling each layer for the crumb topping. This is actually the cake I made from a few months ago. I was planning on baking this, but I made way too many batches of cupcakes (4 batches in 4 days!) and my family and I are all caked out. I'm just grateful that they're not annoyed with me after I forced them to try the same recipe 4 times with only a single ingredient modified. If someone could please share a moist, fine crumbed and soft vanilla cupcake recipe, I would be really thankful!
Thanks to Stephanie of Confessions of a City Eater for choosing this recipe, which can be found on her blog and here. Don't forget to visit the TWD Blogroll!
 After my last batch of blueberry muffins, all i could think about was baking muffins again! (Just in case it was a fluke the first time..haha) I don’t think I’ve felt this excited about a recipe, since CI’s CCC, which I’m still in the process of tweaking. This time, I decided to go with cranberries and orange. After repeatedly telling Audrey I would make her Cranberry Orange bread for months and not doing it was a little embarassing! Rather than baking a loaf, I decided to go with the cranberry orange combination in a muffin form. The only changes I made to the original recipe was add 2 tablespoons (1/4 cup for full recipe) of sugar and 1 tablespoon (2 tablespoons for full recipe) of sugar to the cranberry sauce because cranberries are more sour than blueberries. Last time, I baked at 375 because I was afraid of over drying, since I halved the recipe and made them smaller. This time, I decided to bake at 400F to see if I could get a better rise. After 10 minutes, I lowered the temperature back down to 350 because I had a feeling they would dry out. I think I’m going to have to make a full recipe (which shouldn’t be a problem!) so I can bake at 400 and get higher tops without worrying about overdoneness.
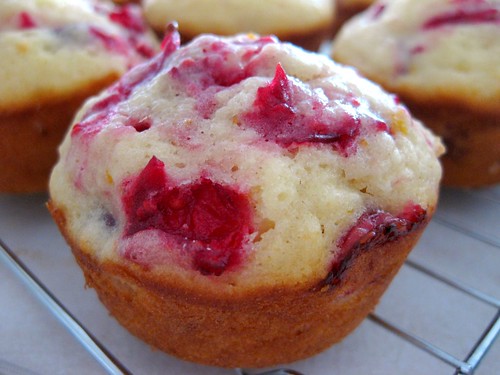
Other than the texture, another reason I absolutely love these muffins is their ability to stay fresh for a longer period of time. The next day, the muffins were still moist (although not as much as the first day) and not crumbly at all! Isn’t it weird that something that has less fat than a yellow cake and uses all purpose flour manages to stay moist yet my Billy Billy vanilla cupcakes do a 180 on me and transform from 'cake mix' like texture to crumbly a few hours later?
Cranberry Orange Muffins
Original recipe from food according to me
2 cups fresh cranberries, quartered
2 1/2 cups unbleached all-purpose flour, 12 ½ ounces
2 tsp baking powder
1 tsp salt
8 ounces white sugar (I just used 1 1/4 cup) + 2 tablespoons (for cooking the sauce
3 large whole eggs
4 tablespoons unsalted butter, melted and cooled slightly
1/4 cup vegetable oil
3/4 cup buttermilk (I used 1 tbsp vinegar and added milk until it reached one cup)
1 1/2 tsp vanilla extract
4 tsp turbinado sugar
zest of one orange
1. Adjust oven rack to upper-middle position to heat oven to 400ºF. (I used 375)Prepare muffin tins.
2. Bring 1 cup fresh cranberries to a simmer in a small saucepan over medium heat. Cook, stirring frequently and pressing cranberries against the side of the pot, until berries have broken down and mixture is thickened, about five minutes. Remove from heat and cool slightly.
3. Whisk flour, baking powder, and salt together in the large bowl. Set aside.
4. In a separate bowl, whisk eggs, sugar, orange zest together until pale and fluffy. Slowly whisk in melted butter and oil. Whisk in buttermilk and vanilla until combined.
5. Using a rubber spatula, gently fold in remaining one cup cranberries.
6. Gently fold in flour mixture until just moistened. Batter will be very lumpy.
7. Using a large spoon, divide half of the batter equally among the 12 muffin cups (about a third filled.) Place a heaping teaspoon of berry mixture on top of batter. Scoop remaining batter on top of berry filling. Using a bamboo skewer, gently swirl berry filling into batter.
8. Sprinkle turbinado sugar on top of the muffins.
9. Bake until muffin tops are golden and just firm, 17 to 19 minutes. (I took them out when a toothpick inserted had like 2 mini crumbs attached - almost perfectly clean, but not with huge crumbs attached either). Cool muffins in pan for 5 minutes, then transfer to wire rack and cool for five minutes more before serving.
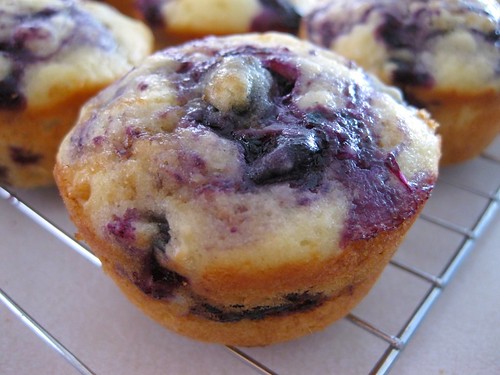 I don't think I've made a better muffin, ever. These were were absolutely amazing!! I think I've said this before, but I'm not a fan of muffins mostly because they're either too dessert-like (but suprisingly taste bad considering the amount of fat) or too lean that it's just not worth wasting the calories over. These however, were definitely 'muffin' muffins and packed full of flavour. Every bite had a burst full of blueberry yumminess either from the whole blueberries or the swirled bluberry sauce. Umm.. yes, blueberry sauce, but trust me, it was definitely worth the 5 extra minutes and extra pot to wash. Too bad I didn't have any of the dried blueberries the recipe called for so I had to omit them. Best of all, the crumb was moist, tender, yet sturdy enough to support all the blueberries. The combination of butter and oil provided both flavour and moisture, which made these delicious even a few hours later. We all know how disappointing it can be when a muffin or anything that's still warm tastes amazing only to turn dry or crumbly later on. The only thing that was missing in these muffins is a bigger muffin top, but maybe it's because I made them smaller or baked at a lower temperature.
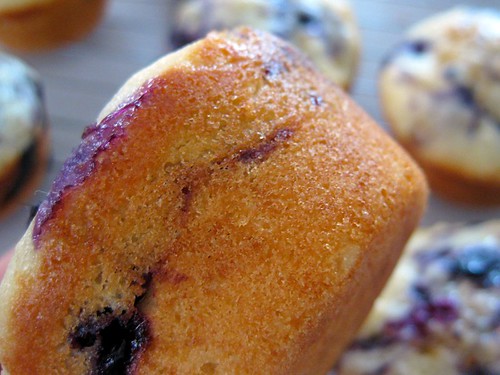
I halved the recipe, got 10 muffins using my large cookie scoop and baked them at 375 instead of 400 because mine were a little smaller. I finally used my Williams-Sonoma Goldtouch pan I got for Christmas and I love it!! The baking is even so the edges don't dry out by the time the centre is cooked and the crust is perfectly golden without being burnt. I think this is the most amazing pan I've baked with, but I've only used Wilton, which suck because of all the trimming I have to do from the top doming and around overdone sides and Chicago Metallic, which are pretty good except that they brown the edges more. Now, I need to get some Goldtouch 8 inch rounds and loaf pans!!
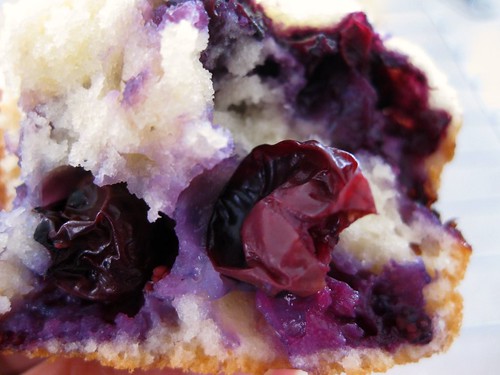
The blueberry sauce is genius because you get a pretty swirl of blue inside, but not an overall blue muffin. It also provides a lot of moisture and flavour from the extra concentrated blueberry juice. I found the recipe at food.according to me.
I think the key to the tenderness and texture of these muffins compared to others I've tried is the mixing method.
* Instead of just whisking all the wet together at the same time, the eggs and sugar are first whisked by hand until pale and fluffy (I whisked so much the eggs and sugar actually ribboned and I thought I was going to lose my arm)
* Next, the fats are slowly whisked in followed by the liquids and extract.
* The berries are also added with the wet before the flour. Since they're not folded at the end, it helps to prevent overmixing. (this is my favourite step and what I've always done with addins to eliminate any possibility for overmixing)
* Also, it's important that the flour is measured correctly. Since these muffins aren't loaded with fat any extra flour will definitely make them too dense.
Blueberry Muffins
Recipe from food according to me
2 cups fresh blueberries, about 10 ounces
1/2 cup dried blueberries (I didn't have any)
2 1/2 cups unbleached all-purpose flour, 12 ½ ounces
2 tsp baking powder
1 tsp salt
8 ounces white sugar (I just used 1 cup, which is 7 ounces because my berries were really sweet)
3 large whole eggs
4 tablespoons unsalted butter, melted and cooled slightly
1/4 cup vegetable oil
3/4 cup buttermilk (I used 1 tbsp vinegar and added milk until it reached one cup)
1 1/2 tsp vanilla extract
4 tsp turbinado sugar
1. Adjust oven rack to upper-middle position to heat oven to 400ºF. (I used 375)Prepare muffin tins.
2. Bring 1 cup fresh blueberries and all dried blueberries to a simmer in a small saucepan over medium heat. Cook, stirring frequently and pressing blueberries against the side of the pot, until berries have broken down and mixture is thickened, about five minutes. Remove from heat and cool slightly.
3. Whisk flour, baking powder, and salt together in the large bowl. Set aside.
4. In a separate bowl, whisk eggs and sugar together until pale and fluffy. Slowly whisk in melted butter and oil until incorporated. Whisk in buttermilk and vanilla until combined.
5. Using a rubber spatula, gently fold in remaining one cup blueberries.
6. Gently fold in flour mixture until just moistened. Batter will be very lumpy.
7. Using a large spoon, divide half of the batter equally among the 12 muffin cups (about a third filled.) Place a heaping teaspoon of berry mixture on top of batter. Scoop remaining batter on top of berry filling. Using a bamboo skewer, gently swirl berry filling into batter.
8. Sprinkle turbinado sugar on top of the muffins.
9. Bake until muffin tops are golden and just firm, 17 to 19 minutes. (I took them out when a toothpick inserted had like 2 mini crumbs attached - almost perfectly clean, but not with huge crumbs attached either) Cool muffins in pan for 5 minutes, then transfer to wire rack and cool for five minutes more before serving.
 I can't believe I passed these over when I was deciding what to bake for Christmas. These were incredible and this is coming from someone who is not a fan of chocolate based cookies. These were perfect after a stressful day of school. Even though I ended up baking them at 10pm, I couldn't stop eating them! But of course, I left a few for taking pictures the next day in natural lighting..haha. Ok, so I didn't actually eat all 32 cookies myself, but I wish I did because they were just that good!
The line between done and overbaking is very fine when it comes to cookies. Even one minute can feel like an eternity, especially near the end when you're debating whether or not to pull them out. I ended up baking one sheet at 13 minutes and the second sheet at 11 minutes. 13 because they just looked too raw to me to take out at 12 minutes and 11 because I caught the Dorie note that the cookies are supposed to look raw. Everyone seemed to like the 11 minute cookie because it provided a nice textural contrast with a sandy outside and a melt in your mouth centre. I think the best part about these cookies is how the cookie didn't turn hockey puck or soft on me. I wonder if the texture would have been different if I baked chilled dough instead of freezing it. I'm guessing they probably would have melted out like these cookies I made a long time ago. Freezing for one hour as well as compressing the dough made slicing a lot easier and no crumbling!
Thanks to Jessica of cookbookhabit for choosing this recipe, which can be found on her blog and in Dorie Greenspan's Baking: From my Home to Yours. Don't forget to checkout the TWD Blogroll!