Friday, June 27, 2008

Devil's Food White Out Cake

cakedevilswhiteoutedit

When I first started reading food blogs, the Darling Bakers were on Dorie's perfect party cake. After all the raving about this cake, I became interested in her recipes and started to follow the bloggers of Tuesdays With Dorie. 3 months later, I finally ordered my copy after getting over the worry that I would receive one with the edges bent or a scratch down the middle. The book finally arrived, but then came the problem of choosing the first recipe to try. The devils food white out cake on the cover looked so delicious and beautiful I decided to start off with the layer cake. Having read the chocolate cake recipes by Cook's Illustrated, I couldn't help but compare the ingredients and mixing methods. Cook's claim that adding the boiling water to the cocoa would deepen the flavour, but in this recipe the boiling water was added last. I decided that this time I would just stick to the recipe completely, which is actually a lot harder than it sounds.

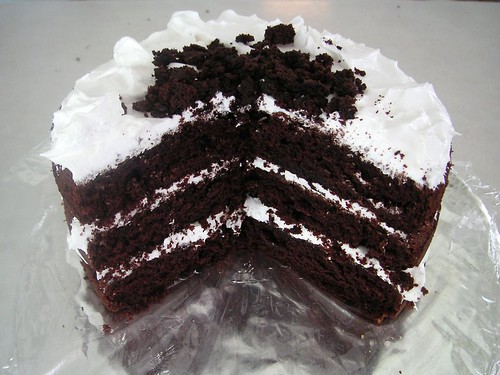
Luckily, Dorie left a note saying that the butter/sugar/egg mixture would curdle because I got really worried when the beautiful emulsion of fat and sugar broke and started to clump. As soon as the melted chocolate was added, the mixture magically came together and was smooth and silky. I didn't have 8x2 inch pans so I divided the batter into 3 8x1.5 inch pans. Usually I get a whole lot of doming so I was planning on getting the crumbs from the cake shavings. This time, the cakes came out pretty flat so I only had enough crumbs to make a small pile on top.
While most people believe that a cake is a vehicle for frosting, I have yet to find a frosting other than whipped cream that I truly love. I actually love eating cake for cake and usually find myself scraping the frosting off. As much as I wish I could love buttercream, I just can't get past that feeling of eating a stick of butter. The Italian merangue frosting on this cake was very light and fluffy, a perfect balance for the rich layers. Despite its lightness, I went easy on the frosting and didn't even frost the outside, a tendency of mine.

cakedevilswhiteout (2)

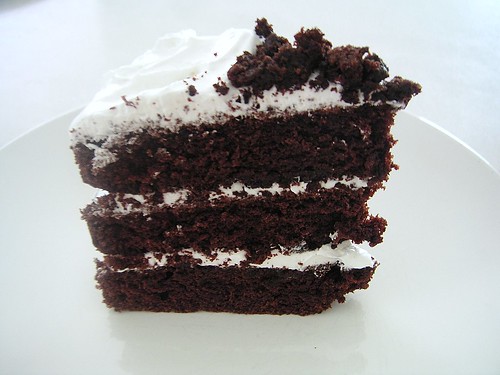
The cake was fluffy, not greasy, moist, yet sturdy enough to slice cleanly. It also had the perfect amount of richness, unlike recipes that leave your feeling like you've just eaten a frosted brownie. This was definitely the best chocolate cake I've ever made, even better than Epicurious' double chocolate cake. The Epicurious cake is also very moist and fluffy, but lacked the density of a cake made with butter. I think I could have eaten the whole cake myself, but I fell into a sugar coma after my huge slice. Luckily I still had one slice left for breakfast!

cakedevilswhiteout (3)

Devil's Food White Out Cake
Dorie Greenspan, Baking: From My Home to Yours

Makes makes 12 servings

For the cake
1 1/3 cups all-purpose flour
1/2 cup unsweetened cocoa powder
3/4 teaspoon baking soda
1/2 teaspoon baking powder
1/4 teaspoon salt
1 1/4 sticks (10 tablespoons) unsalted butter, at room temperature
1/2 cup (packed) light brown sugar
1/2 cup sugar
3 large eggs, at room temperature
1 teaspoon pure vanilla extract
2 ounces bittersweet chocolate, melted and cooled
1/2 cup buttermilk or whole milk, at room temperature
1/2 cup boiling water
4 ounces semisweet or milk chocolate, finely chopped, or 2/3 cup store-bought mini chocolate chips

For the filling and frosting
1/2 cup egg whites (about 4 large)
1 cup sugar
3/4 teaspoon cream of tartar
1 cup water
1 tablespoon pure vanilla extract

GETTING READY: Center a rack in the oven and preheat the oven to 350 degrees F. Butter two 8-x-2-inch round cake pans, dust the insides with flour, tap out the excess and line the bottoms with parchment or wax paper. Put the pans on a baking sheet.

TO MAKE THE CAKE: Sift together the flour, cocoa, baking soda, baking powder and salt.

Working with a stand mixer, preferably fitted with a paddle attachment, or with a hand mixer in a large bowl, beat the butter on medium speed until soft and creamy. Add the sugars and continue to beat for another 3 minutes. Add the eggs one by one, beating for 1 minute after each addition. Beat in the vanilla; don't be concerned if the mixture looks curdled. Reduce the mixer speed to low and mix in the melted chocolate. When it is fully incorporated, add the dry ingredients alternately with the buttermilk, adding the dry ingredients in 3 additions and the milk in 2 (begin and end with the dry ingredients); scrape down the sides of the bowl as needed and mix only until the ingredients disappear into the batter. At this point, the batter will be thick, like frosting. Still working on low speed, mix in the boiling water, which will thin the batter considerably. Switch to a rubber spatula, scrape down the bowl and stir in the chopped chocolate. Divide the batter evenly between the two pans and smooth the tops with the rubber spatula.

Bake for 25 to 30 minutes, rotating the pans at the midway point. When fully baked, the cakes will be springy to the touch and a thin knife inserted into the centers will come out clean. Don't worry if the tops have a few small cracks. Transfer the cake pans to a rack and cool for about 5 minutes, then run a knife around the sides of the cakes, unmold them and peel off the paper liners. Invert and cool to room temperature right side up. (The cooled cake layers can be wrapped airtight and stored at room temperature overnight or frozen for up to 2 months.)

When you are ready to fill and frost the cake, inspect the layers. If the cakes have crowned, use a long serrated knife and a gentle sawing motion to even them. With the same knife, slice each layer horizontally in half. Set 3 layers aside and crumble the fourth layer; set the crumbs aside.

TO MAKE THE FILLING AND FROSTING: Put the egg whites in a clean, dry mixer bowl or in another large bowl. Have a candy thermometer at hand.

Put the sugar, cream of tartar and water in a small saucepan and stir to combine. Bring the mixture to a boil over medium-high heat, cover the pan and boil for 3 minutes. Uncover and allow the syrup to boil until it reaches 242 degrees F on the candy thermometer. While the syrup is cooking, start beating the egg whites.

When the syrup is at about 235 degrees F, begin beating the egg whites on medium speed with the whisk attachment or with a hand mixer. If the whites form firm, shiny peaks before the syrup reaches temperature, reduce the mixer speed to low and keep mixing the whites until the syrup catches up. With the mixer at medium speed, and standing back slightly, carefully pour in the hot syrup, pouring it between the beater(s) and the side of the bowl. Splatters are inevitable -- don't try to scrape them into the whites, just carry on. Add the vanilla extract and keep beating the whites at medium speed until they reach room temperature, about 5 minutes. You should have a smooth, shiny, marshmallowy frosting. Although you could keep it in the fridge in a pinch, it's really better to use it right now.

TO ASSEMBLE THE CAKE: Put a bottom layer cut side up on a cardboard cake round or on a cake plate protected by strips of wax or parchment paper. Using a long metal icing spatula, cover the layer generously with frosting. Top with a second layer, cut side up, and frost it. Finish with the third layer, cut side down, and frost the sides and top of the cake. Don't worry about smoothing the frosting -- it should be swirly. Now, cover the entire cake with the chocolate cake crumbs, gently pressing the crumbs into the filling with your fingers.

Refrigerate the cake for about 1 hour before serving. (If it's more convenient, you can chill the cake for 8 hours or more; cover it loosely and keep it away from foods with strong odors.)

SERVING: I think the cake is best at room temperature or just cool, but many people prefer it cold (the texture of the cake becomes fudgier after it has been refrigerated). No matter the temperature, the cake is so pretty it should be cut at the table, so bring it out on a platter and cut it into generous wedges using a serrated knife and a sawing motion.

STORING: The frosted cake can be stored in the refrigerator for up to 2 days; let it stand at room temperature for 30 minutes before serving, or longer if you have the time.

Tuesday, June 24, 2008

Banana Bread

quickbananabread (2)

Banana bread is one of my favourite desserts. It was actually one of the first 'scratch' recipes I tried (the other being chocolate chip cookies) and the last until I got interested in baking again this past Christmas. I will never forget the first time I made banana bread because it was dry yet uncooked, soapy, chewy and definitely overmixed. Those were the days when I didn't know that the mixing order of ingredients actually mattered, the importance of whisking the flour mixture to distribute the baking soda evenly and when using a handmixer to be extra careful not to overmix. I remember baking 3 loaves before I finally gave up and settled for storebought desserts.

I've tried almost all the recipes from allrecipes.com, but the best version is definitely from Cook's Illustrated. You don`t need to lug out the mixer or anything fancy, just 2 bowls and good wide spatula so cleanup is quick and easy. It has suprisingly good butter flavour without the banana bread tasting like a cake and uses just enough bananas for strong flavour without turning the bread gummy. Most recipes use nuts or chocolate chips or neither, but I decided to put walnuts on one side and chocolate chips on the other so I could get both. This was actually the first time I used nuts in baking and enjoyed it more than I expected. I also used a bundt pan instead of the regular loaf pan so it took 40 minutes instead of the regular 55.

quickbreadbanana

I wish I was able to take a picture of the entire cake, but I couldn't resist eating a slice.. well more like 3! My bananas were speckled, but I wanted them really really ripe so I put them in a baking pan and turned the oven to 150-200F for 20 minutes. The heat carmelizes the bananas, which helps to sweeten and add more banana flavour to the bread.

EDIT: My new favourite banana recipe can be found here. It is a little fluffier than this one by Cook's Illustrated, but if you like denser and chewier, I would say go with Cook's Illustrated.

Banana Bread
Cook's Illustrated, The New Best Recipe

2 cups unbleached all-purpose flour, plus more for dusting the pan
1 1/4 cups walnuts, chopped coarse
3/4 cup sugar
3/4 teaspoon baking soda
1/2 teaspoon salt
3 very ripe, soft, darkly speckled large bananas, mashed well (about 1 1/2 cups)
1/4 cup plain yogurt
2 large eggs, beaten lightly
3/4 stick unsalted butter, melted and cooled
1 teaspoon vanilla extract

1. Adjust an oven rack to the lower-middle position and heat the oven to 350°F (175°C) degrees. Grease the bottom and sides of a 9 by 5-inch loaf pan; dust with flour, tapping out the excess.

2. Spread the walnuts on a baking sheet and toast until fragrant, 5 to 10 minutes. Set aside to cool.

3. Whisk the flour, sugar, baking soda, salt, and walnuts together in a large bowl; set aside.

4. Mix the mashed bananas, yogurt, eggs, butter, and vanilla with a wooden spoon in a medium bowl. Lightly fold the banana mixture into the dry ingredients with a rubber spatula until just combined and the batter looks thick and chunky. Scrape the batter into the prepared loaf pan.

5. Bake until the loaf is golden brown and a toothpick inserted in the center comes out clean, about 55 minutes. Cool in the pan for 5 minutes, then transfer to a wire rack. Serve warm or at room temperature. (The bread can be wrapped with plastic wrap and stored at room temperature for up to 3 days.)

Sunday, June 22, 2008

Focaccia

breadfocaccia

A week ago, before completing the cinnamon swirl bread, I definitely wouldn't have attempted making focaccia. It's not only because I'm a little intimidated by the whole bread making process, but it's just something I don't automatically think to make, but to buy. Once again, I chose the recipe from the always reliable Cook's Illustrated. I just love the way they test all the possible variations of ingredients, equipment, methods and baking temperatures so that the final product is the best possible version. The instructions, mixing times and speeds are very specific so that even the unsure or inexperienced baker can follow along. The most interesting ingredient in the recipe was probably the potato, which the authors claim adds moisture, softness and chewiness without density. Since I love testing flavour variations and the recipe made such a large piece of bread, I used rosemary + salt, sundried tomato + salt, rosemary + sundried tomato + salt, and finally parmesan cheese as toppings. Normally, I'm not that generous when it comes to greasing, but to achieve a crunchy crust, oil is a must. I only wish the picture above didn't have that spatula lying at the top and the bottom corners cut, but this was the only non blurry picture!

breadfocaccia (3)
breadfocaccia (4)

Here are 2 closeups I just had to post. It appears that the only pictures with clarity are the ones where I place my camera on the counter!

The end result was everything I could ask for - crunchy outside, soft and moist inside with a slight chew, but not overly chewy (and it wasn't overly greasy either!). This bread tastes great on its own and would probably work well as sandwich bread. I would love to make bagels next, but first I need to find hi gluten flour. After all that shaking and hopping of my KA around the counter, I should probably let it rest. It kills me when I have to baby my mixer for fear of the motor burning out or the gears stripping.

The recipe can be found here. Note, it only took 14 minutes in my oven and after 5 minutes at 425, the sundried tomatoes were starting to burn so I had to turn it down to 400. Unfortunately all ovens are different so be sure to keep an eye on it, especially since its baking at 425!

Thursday, June 19, 2008

Glazed Lemon Cookies.. Glazeless


When I used to babysit, the kids' mom would buy pillsbury cut and slice cookies and bake them for us to eat. I kind of forgot what they taste like, but remember eating so many of those bunny printed cookies that I would feel a little sick. I came across Cafe Johnsonia where she made cut and slice lemon cookies. Since I still had that little bit of lemon left from my lemon bundt cake (yes.. that long ago) and I got to test out my new food processor, it was perfect.

It may be hard to tell from my picture, but I made half lemon (right) and half lemon-orange-cornmeal (left). I definitely need to improve on picture taking. Most of the time, I have to take the same picture using different settings because there are so many, my hand is shaking or the lighting is all wrong! Anyway, the cornmeal actually added a nice crunch, but also roughness. The cookies were very flavourful and shortbread-like with more of a crunch, but I don't think I'll make them again. Maybe its because I don't like shortbread cookies in general, the absence of brown sugar or the missing glaze. From what I remember, the Pillsbury cookies had more a chew to them, like snickerdoodles or those Tim Horton's 'gourmet' cookies so I think they may be a different kind of slice-and-bake.

This is totally unrelated, but I'm excited for the Wilton cake decorating classes at Michaels I signed up for. Hopefully I can learn some much needed basic cake decorating skills! It amazes me how creative people are with decorating, plating and flavour combinations that I hope will come with time.

The recipe (yes, another CI one) can be found at
Cafe Johnsonia, where there are amazing step by step instructions.

Tuesday, June 17, 2008

Cinnamon Swirl Bread


It literally almost took the entire day to bake one loaf of bread, but it was all worth it in the end. I've never made bread before and have been dying to try it, but being limited to all purpose and cake flour, it seemed that white bread was the way to go. Since I was going to make the cinnamon bread I saw at Closet Cooking anway, I decided to make cinnamon swirl bread rather than a quick bread. The experience was a litte nerve racking because it is so easy to mess up a loaf of bread given all the different steps. I didn't have instant yeast so I used traditional. Even though the bread called for 2 1/4 tsps, I only used 1 tsp because I was afraid of that yeasty bitter taste. The recipe calls for 3 1/4 to 3 3/4 cups of flour depending on the weather, but I'm sure I used at least 4 cups and the dough was still sticky. I think the most difficult part of this entire process was all the waiting. Even though the recipe said to wait 2 -2.5 hours for the first rise, I waited 4 hours to get a nicer rise. Rolling the dough was a little tricky because it was so sticky. Luckily I placed a sheet of saran wrap on my counter first or else it would have been one deformed looking loaf! The recipe said to wait 1-1.5 hours, but I waited 2 hours before the loaf was 1 inch above the rim. Finally it was ready for the oven.


I didn't know that the slit was facing the side instead of the bottom of the pan until it unravelling in the oven. This loaf grew so quickly in the oven! It was supposed to take 30-35 minutes, but I ended up leaving it in the oven for 40 minutes. The thermometer never reached 185 degrees, but the thermometer went in easily and came out clean. Luckily I pulled it out or it would have been too dry. Just because it is bread, it should follow the same 'if the toothpick (thermometer in this case) comes out clean, it is done!' as cake.. right?... well hopefuly!


Finally, after 2 hours of cooling it was time to eat! As usual, I didn't grease the pan and the bread slid out easily. I could have devoured half the loaf myself, but knowing that 4 cups of flour went into it, I wasn't going to eat 2 cups worth of flour at 8:30pm. I think I'm going to attempt to make cinnamon rolls soon, but first I need to find one that isn't so rich and won't leave me nauseas like those cinnabons, which are definitely delicious, but o so rich!

Cinnamon Swirl Bread
Cook's Illustrated

* I rarely grease and luckily nothing sticks or gets ruined, but for those who try this recipe, it is probably safer to grease.

Dough
1/2 cup milk
4 tbsp unsalted butter, cut into 1/2 inch pieces
1 package dry active yeast (2 1/4 tsp)(I used 1 tsp of traditional yeast)
1/2 cup warm water
1/3 cup sugar
2 large eggs
1 1/2 tsp salt
3 1/4 cups all-purpose flour, plus extra

Filling
1/4 cup sugar
5 tsp ground cinnamon
Milk for brushing

Glaze
1 large egg
2 tsp milk

1. Heat the milk and butter together in a small saucepan or microwave until butter melts. Cool to lukewarm.
2. Meanwhile, sprinkle yeast over warm water in a the bowl of a standing mixer fitted with the paddle (I did this with half the amount of warm water and waited until the yeast mixture foamed - took about 30 mins) Beat in the sugar, eggs and mix at low speed to blend. Add the salt, lukewarm milk mixture,(I added the other half of the warm water), and 2 cups of flour; mix at medium speed until thoroughly blended, about 1 minute. Switch to dough hook. Add 1 1/4 cups more flour and knead at medium low speed, adding more flour if the dough sticks to the sides of the bowl, until the dough is smooth and comes away from the sidesw of the bowl, about 10 minutes
3. Turn the dough onto a work surface. Squeeze the dough with a clean dry hand. If the dough is sticky, knead up to 1/2 cup more flour to form a smooth, soft, elastic dough. Transfer the dough to a very lightly oiled large bowl (I just floured a bowl, without oiling)Cover the bowl with plastic wrap and let the dough rise until doubled in size, 2 to 2 1/2 hours (4 hours for me)(the ideal rising temp is 75 degrees) After the rise, punch down the center of the dough once (The dough can be refrigerated, covered, for up to 18 hours). Make sure not to fold the dough, turn it onto an unfloured work surface (I lined the work surface with saran wrap to prevent sticking); let the dough rest about 10 minutes.
4. Grease the bottom and sides of a 9 by 5 inch loaf pan (I just floured without greasing) Mix the sugar and cinnamon in a small bowl.
5. Press dough into an evenly shaped 8 x 6 inch rectangle. With the short side of the dough facing you, roll the dough witha rolling pin into an evenly shaped 18 x 8 inch rectangle. Brush the dough liberally with milk. Sprinkle the filling evenly, leaving a 1/2 inch edge on the far side. Starting at the side closest to you, roll dough, pinching the dough gently with your fingertips to make sure it is tightly sealed. To keep the loaf from stretching beyond 9 inches, push the ends in occasionally with your hands as you roll the dough. Pinch the seam and both ends to seal the loaf.
6. Place the loaf seam side down in the prepared pan and lightly press to flatten. Cover the top of the pan loosely with plastic wrap and set aside to rise to 1 inch above the pan, about 1 1/2 hours (2 hours for me) Preheat oven to 350
7. Whisk the egg and milk together and gently brush the top of the loaf with the egg mixture.
8. Bake until the loaf is golden brown and an instant read thermometer inserted at an angle into the centre reaches 185-190, 30-35 minutes (40 for me). Remove the bread from the pan and cool on a wire rack before slicing, about 45 minutes.

For those who don't own a stand mixer, Two Fat Als gives instructions for kneading

Friday, June 13, 2008

Lemon Bundt Cake


Ever since I saw this post about the lemon bundt cake, it looked too delicious not to try. Before I try new recipes, I always do a search to make sure that it worked for others and where it is from because I've had too many bad experiences in the past with recipes that are way too advanced or just simply flopped. Luckily, this recipe received great reviews and is also from Cook's Illustrated, which is definitely a bonus. Before I even started on the cake, I had to get a bundt pan, but with so many designs it was hard to choose. In the end, I picked up the anniversary classic bundt pan, since there are only so many times I can bake a castle or a rose cake.

Scanning over the recipe, the first thing that caught my eye was the 18 tablespoons of butter! I was planning on making half the recipe anyway, since that's what I usually do when I try new desserts. I decided that instead of using 9 tablespoons of butter for the halved recipe, I would just do 8 tablespoons. A one tablespoon reduction of butter may not seem much, but in the end, it all adds up! 1.5 flour/8 tablespoons of butter is my usual ratio for flour to butter anyway, any higher and the cake feels a little too rich. To prevent using more butter, I never grease my pans, but I do line it with parchment. I can't line a bundt pan, but this cake had enough butter that it fell out easily. My favourite part of the recipe was the use of freshly squeezed lemon juice and buttermilk. Since both ingredients help to tenderize cakes, it can be extremely helpful for an inexperienced baker like me, especially since this cake calls for all purpose flour.


Its amazing how the addition of an egg can curdle the creamed butter and sugar, but when the speed is increased, the curdled mess transforms into the smoothest and fluffiest mixture. When the cake was done and finally cool, I couldn't wait to cut a slice and hope that the crumb was just as tight and tender as ones I have seen. I ate it plain with no glaze or icing sugar and was so moist and fluffy. This was definitely one of the better cakes I've made.

Lemon Bundt Cake
Adapted from Cook's Illustrated

Serves 12 to 14

Cake

3 lemons , zest grated and saved, then juiced for 3 tablespoons juice
3 cups unbleached all-purpose flour (15 ounces)
1 teaspoon baking powder
1/2 teaspoon baking soda
1 teaspoon table salt
1 teaspoon vanilla extract
3/4 cup low-fat buttermilk (preferably)
3 large eggs , at room temperature
1 large egg yolk , at room temperature
18 tablespoons unsalted butter (2 1/4 sticks), at room temperature (I used 16 tablespoons)
2 cups sugar (14 ounces)

Glaze

2 - 3 tablespoons fresh lemon juice (see note above)
1 tablespoon buttermilk
2 cups confectioners' sugar (8 ounces)

1. FOR THE CAKE: Adjust oven rack to lower-middle position; heat oven to 350 degrees. Spray 12-cup Bundt pan with nonstick baking spray with flour (alternatively, brush pan with mixture of 1 tablespoon flour and 1 tablespoon melted butter). Mince lemon zest to fine paste (you should have about 2 tablespoons). Combine zest and lemon juice in small bowl; set aside to soften, 10 to 15 minutes.

2. Whisk flour, baking powder, baking soda, and salt in large bowl. Combine lemon juice mixture, vanilla, and buttermilk in medium bowl. In small bowl, gently whisk eggs and yolk to combine. In standing mixer fitted with flat beater, cream butter and sugar at medium-high speed until pale and fluffy, about 3 minutes; scrape down sides of bowl with rubber spatula. Reduce to medium speed and add half of eggs, mixing until incorporated, about 15 seconds. Repeat with remaining eggs; scrape down bowl again. Reduce to low speed; add about one-third of flour mixture, followed by half of buttermilk mixture, mixing until just incorporated after each addition (about 5 seconds). Repeat using half of remaining flour mixture and all of remaining buttermilk mixture. Scrape bowl and add remaining flour mixture; mix at medium-low speed until batter is thoroughly combined, about 15 seconds. Remove bowl from mixer and fold batter once or twice with rubber spatula to incorporate any remaining flour. Scrape into prepared pan.

3. Bake until top is golden brown and wooden skewer or toothpick inserted into center comes out with no crumbs attached, 45 to 50 minutes.

4. FOR THE GLAZE: While cake is baking, whisk 2 tablespoons lemon juice, buttermilk, and confectioners' sugar until smooth, adding more lemon juice gradually as needed until glaze is thick but still pourable (mixture should leave faint trail across bottom of mixing bowl when drizzled from whisk). Cool cake in pan on wire rack set over baking sheet for 10 minutes, then invert cake directly onto rack. Pour half of glaze over warm cake and let cool for 1 hour; pour remaining glaze evenly over top of cake and continue to cool to room temperature, at least 2 hours. Cut into slices and serve.

Thursday, June 12, 2008

Peanut Butter Cookies


I love peanut butter, I love it so much that I eat it by the spoonful everyday so when I found out about Cook's Illustrated's peanut butter recipe, I had to try it. The first time I ever made peanut butter cookies, the recipe was off the back of the jar, which was good, but I wanted a cookie with flour in it. Soon enough I was trying various recipes, but all of them seemed to taste like peanut butter flavoured dough.

Now that I've made CI's version, they are definitely the best peanut butter cookies ever. The processed peanutes give it that extra peanut butter flavour and texture. I have to admit that CI recipes are usually a little sweet for me so I reduced the white and brown sugar from 1 cup to 3/4 cup, reducing 1/2 cup of sugar overall. The only mistake I made was being a little heavy handed with the salt, which normally is ok, but I reduced the sugar, and used salted butter, which in combination with the salted peanuts left a saltier aftertaste than I would like. The overall result was still great and better than any other peanut butter cookie I've ever tasted. If anyone asks, I'll just say that they're supposed to be savoury cookies! I also left the cookies on the tray for 2 minutes instead of 4 so I could have crispier peanut butter cookies.

Big, Super-Nutty Peanut Butter Cookies
Adapted from Cook's Illustrated

Makes approximately 3 dozen cookies

2 1/2 cups unbleached all-purpose flour
1/2 teaspoon baking soda
1/2 teaspoon baking powder
1/2 teaspoon table salt
1/2 pound butter (2 sticks), salted
3/4 cup packed dark brown sugar (my changes)
3/4 cup granulated sugar (my changes)
1 cup extra-crunchy peanut butter , preferably Jif
2 large eggs
2 teaspoons vanilla extract
1 cup roasted salted peanuts , ground in food processor to resemble bread crumbs, about 14 pulses (about 1 cup, packed)

1. Adjust oven rack to low center position; heat oven to 350 degrees. Sift flour, baking soda, baking powder, and salt in medium bowl.

2. In bowl of electric mixer or by hand, beat butter until creamy. Add sugars; beat until fluffy, about 3 minutes with electric mixer, stopping to scrape down bowl as necessary. Beat in peanut butter until fully incorporated, then eggs, one at a time, then vanilla. Gently stir dry ingredients into peanut butter mixture. Add ground peanuts; stir gently until just incorporated.

3. Working with 2 tablespoons dough at a time (see illustration 1 below), roll into large balls, placing them 2 inches apart on a parchment-covered cookie sheet. Following illustration 2, press each dough ball with back of dinner fork dipped in cold water to make crisscross design. Bake until cookies are puffed and slightly brown along edges, but not top, 10 to 12 minutes (they will not look fully baked). Cool cookies on cookie sheet until set, about 4 minutes (2 minutes for cookies with more crisp) , then transfer to wire rack to cool completely. Cookies will keep, refrigerated in an airtight container, up to 7 days.

Wednesday, June 11, 2008

Brown Sugar


Since this is my first post, I thought I would start off with something simple. Ever since I've been experimenting to find the best chocolate chip cookie, I've been making many trips to the grocery store for brown sugar. At my last visit to bulk barn, I spent 10 dollars on brown sugar alone. While this seems like a lot of sugar, I'm sure I will go through it in no time. As I was whipping up my batch of cookies in the stand mixer, I suddenly remembered seeing a show on TV showing how brown sugar is made in factories. It turns out that brown sugar is just regular white sugar + molasses and in minutes, I made my first batch of brown sugar. The best part is white sugar is half the price of brown sugar and in minutes, I can have fresh brown sugar!

Brown Sugar

1 cup sugar
1 tablespoon molasses

1. Add sugar and molasses in a standmixer and mix on medium speed using the paddle attachment until well combined.

LinkWithin

Related Posts with Thumbnails