Tuesday, December 30, 2008

TWD: Tall and Creamy Cheesecake..sort of

cheesecakelemon

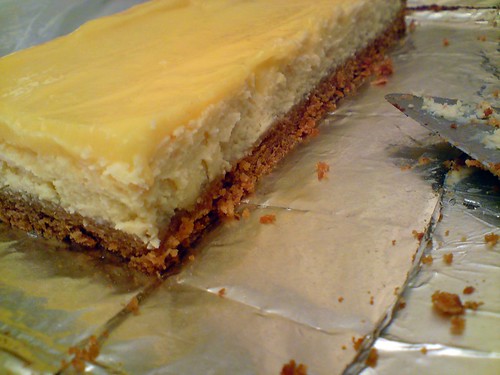
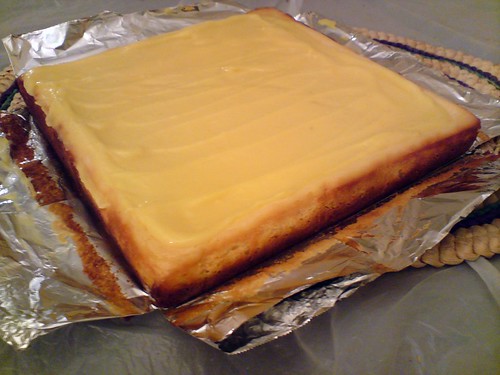
This week's TWD.. I haven't said that in a while! was perfect in time for the holidays. It wasn't very tall because I halved the recipe and baked it in a 9x9 square pan, but it was very creamy! Instead of using the springform, I used a 9x9 square pan so I could bake it in a waterbath without having leakage problems. I totally forgot about the waterbath though so that totally defeated the purpose of not using springform. I was in a huge rush to bake it and have it properly chilled because I decided the morning of Christmas eve that I would bring it over for dinner after seeing Nancy from the Dogs Eat the Crumbs do her informative post for TWD (I love how she looks for other sources when she bakes). Luckily, cheesecake isn't one of those desserts where I have to worry about the crumb changing from soft and fluffy to dense and dry within a couple or hours and can be just thrown in the fridge without messing up the texture. I've tried storing regular cakes wrapped in plastic on the counter overnight, fridge and freezer, but everytime it changes for the worse so I have to make cakes fresh unless if it's chocolate, which actually improves in flavour overtime without sacrificing texture. The whole 'crumb getting even tighter' in the freezer thing doesn't seem to work for me and neither does wrapping the cake before it is completely cool to seal in the texture because that just turns the cake wet and heavy.

Anyway, back to the cheesecake that my family raved about.. I was so excited! I replaced a block of cream cheese with the low fat kind because full fat cheesecake is a little too rich. Cheesecakes are the only kind of dessert that doesn't stress me out because they always turn out delicious no matter which recipe you use.. maybe except for hyper low fat variations. After making cheesecakes with a handmixer, stand mixer and the food processor, I would have to say that the food processor is the quickest and always ensures the smoothest texture. There's barely any scraping involved too! Originally, I wasn't going to make a topping and just serve it plain, the way cheesecakes should be in my opinion, but when I opened the oven door, it looked like something hit it.. badly because there were cracks (huge ones) everywhere! I decided to cover it up with lemon curd instead of whipped cream because we didn't exactly need anymore cream. I don't think I've had real lemon curd before because this was amazing! If this is what the filling is supposed to taste like in lemon meringue pie, then I might actually love it. I love how with each addition of fat (butter then heavy cream), it just gets yummier and more luscious!

cheesecakelemon (2)

Thanks to Anne of Anne Strawberry for choosing this recipe, which can be found on her blog and in Dorie Greenspan's Baking: From my Home to Yours. Don't forget to checkout the TWD Blogroll!

Lemon Curd
Cook's Illustrated

1/3 cup juice from 2 lemons
2 large eggs plus 1 large egg yolk
1/2 cup (3 1/2 ounces) sugar
2 tablespoons unsalted butter, cut into 1/2-inch cubes and chilled
1 tablespoon heavy cream
1/4 teaspoon vanilla extract
Pinch salt
(I added 1/2 tsp of lemon zest for extra lemon flavour)

FOR THE LEMON CURD: While cheesecake bakes, heat lemon juice in small nonreactive saucepan over medium heat until hot but not boiling. Whisk eggs and yolk in medium nonreactive bowl; gradually whisk in sugar. Whisking constantly, slowly pour hot lemon juice into eggs, then return mixture to saucepan and cook over medium heat, stirring constantly with wooden spoon, until mixture registers 170 degrees on instant-read thermometer and is thick enough to cling to spoon, about 3 minutes. Immediately remove pan from heat and stir in cold butter until incorporated; stir in cream, vanilla, and salt, then pour curd through fine-mesh strainer into small nonreactive bowl. Cover surface of curd directly with plastic wrap; refrigerate until needed.

Tuesday, December 23, 2008

Spritz Cookies

cookiespritz (2)

I never thought I would like a butter cookie, after all.. there's no brown sugar or chocolate. 6 cookies later, I realized that I've just never had a good butter cookie, one that is flaky and melt in your mouth. These were absolutely amazing!! I still can't believe I had 6, but I had to.. for 'testing purposes'. 1 extra minute in the oven can make a difference in texture or dryness so I baked at 10, 11 and 12 minutes to see if there would be any. Cookies straight out of the oven and completely cool also differ texturally. It's the texture of a completely cool cookie that actually matters, since cookies don't stay warm forever (if only!). So in the end, I had no choice but to eat 3 straight from the oven at 10, 11, 12 mins and 3 completely cool at each of those time points. 12 minutes was perfect in my oven because the edges were crisp, but at 10 minutes, there was a more melt in your mouth centre.

As enjoyable as these were in the moment, I suffered from major butter overload. After my little cookie splurge, I was craving broccoli and tomatoes! I can't help it, but everytime I try a new recipe I want to find the best possible version. I've had to force myself to accept that airbake pans are the best (although most people don't like them) because there are only so many test cookies I can eat! I find that they're better than jelly rolls because every single batch of cookies I bake on a jelly roll turns out dry with burnt bottoms yet a raw top, but it could be my particular jelly roll pan. Maybe it's time I get a Goldtouch one from William Sonoma. The Goldtouch pans are actually made by Chicago Metallic, which I love because cakes seems to bake up more evenly and leveled. If only it wasn't so difficult to find them and Amazon actually shipped to Canada.

I don't think I would've tried these if it wasn't for the piping part. Piping out cookie dough makes me feel all professional.. haha. It was a lot harder to squeeze the dough out of the bag than I anticipated. I better not wake up with arm pains tomorrow! I think it's time to add a cookie press to the baking gadget collection. I'm making these again tomorrow for Christmas in the almond variation, but other than that I still haven't decided what else to bake yet.. there are just way too many yummy desserts!

cookiespritz (3)

Spritz Cookies
Cook's Illustrated

Makes about 6 dozen 1 1/2-inch cookies

1 large egg yolk 
1 tablespoon heavy cream 
1 teaspoon vanilla extract 
1 cup unsalted butter (2 sticks), softened (about 70 degrees)
2/3 cup sugar (about 4-3/4 ounces)
1/4 teaspoon table salt 
2 cups unbleached all-purpose flour (10 ounces)

1. Adjust oven rack to middle position; heat oven to 375 degrees. In small bowl, beat yolk, cream, and vanilla with fork until combined; set aside.
2. In standing mixer, cream butter, sugar, and salt at medium-high speed until light and fluffy, 3 to 4 minutes. Scrape down bowl with rubber spatula. With mixer running at medium speed, add yolk/cream mixture and beat until incorporated, about 30 seconds. Scrape down bowl. With mixer running at low speed, gradually beat in flour until combined. Scrape down bowl and give final stir with rubber spatula to ensure that no flour pockets remain.
3. If using cookie press to form cookies, follow manufacturer's instructions to fill press; if using pastry bag, follow illustrations 1 through 3 below to fill bag. Press or pipe cookies onto ungreased baking sheets, spacing them about 1-1/2 inches apart. Bake one sheet at a time until cookies are light golden brown, 10 to 12 minutes, rotating baking sheet halfway through baking time. Cool cookies on baking sheet until just warm, 10 to 15 minutes; using metal spatula, transfer to wire rack and cool to room temperature.

almond variation: Grind 1/2 cup sliced almonds and 2 tablespoons flour called for in the spritz recipe until powdery and evenly fine; combine almond mixture with remaining flour. Follow recipe for spritz, substituting 3/4 teaspoon almond extract for vanilla.
lemon variation: add 1 teaspoon lemon juice to yolk/cream mixture in step 1 and add 1 teaspoon finely grated lemon zest to butter along with sugar and salt in step 2.

Wednesday, December 17, 2008

TWD: Grandma's All Occasion Sugar Cookies... Finally!!

cookiessugar (2)

Exams are over!! This cookie dough has been sitting in my fridge for a long, long time.. well not really, but I wasn't expecting it would take me 3 weeks to finally bake it. I didn't think to wrap it tightly and put it in a ziplock bag so there was the slightest bit of freezer burn.. ick. Freezer burn or not, sugar cookies are still not my favourite. I think it's because they're kind of tasteless. I'd rather save the calories for a really good CCC! The truth is, the only sugar cookies I like are the ready to bake Pillsbury Easter and Christmas cookies. It kinda hurts me to say I love frozen cookie dough over homemade, but the texture is so addicting!

Thanks to Ulrike of Ulrike for choosing this recipe, which can be found on her blog and in Dorie Greenspan's Baking: From my Home to Yours. Don't forget to checkout the TWD Blogroll!

Saturday, December 13, 2008

Granola Bars

barsgranola (7)

Is it possible to not like a granola bar? Granola or granola bars are definitely some of the most addicting snacks! I mean, it's practically 'healthy' right.. so it doesn't matter when you've eaten so much you can't believe you've consumed 2 cups or cereal, 2.5 cups of oatmeal, 1/2 cup of peanut butter, 1/2 cup of sugar...and the list goes on! I hope no one does the calorie count because I don't want to know. After searching for what feels like forever to find the perfect granola recipe (I know there isn't a perfect recipe, but CI convinces me otherwise), I finally decided to try the chewy peanut butter granola bars from the savory notebook.

Now before any of you freak when you see the amount of corn syrup, I don't think there can be substitutions for it this time. I've made granola with maple syrup and honey before and even though it was really good, the 'freshness' factor just wasn't there.. I'm not talking about staleness, but I was missing the perfect balance of crisp, crunch yet chewy. I do feel a tad guilty about using so much corn syrup so if anyone knows a good substitution, please let me know!

barsgranola (5)

I made a few modifications..suprisingly..considering I'm usually one of those 'must follow the recipe to the word' people. Since we had lots of Kashi cereal that no one was eating, I substituted that for the puffed brown rice which I didn't have anyway. It added a really nice crunch and was a great way to get rid of it. I also added extra oats because I like my bars really oaty. I reduced the raisins because 1 cup was just way too raisiny, but I would definitely not omit all of it because they just add amazing texture and chewiness. Next time I'm definitely throwing in 1/4 cup of sesame seeds that I forgot this time. Although, I really don't think there should be a next time because this stuff is just way too addicting unless if I have a good excuse.. like getting rid of cereal!

Granola Bars
Adapted from The Savory Notebook

3/4 cup roasted salted peanuts
1/4 cup pumpkin seeds
1/2 cup raisins
1/2 cup dried cranberries
2.5 cups old-fashioned rolled oats (toasted in a 350ยบ oven for 5-8 minutes or until lightly browned and fragrant - 350 tends to burn for me so I reduced to 200)
2 cups puffed brown rice cereal/(I used Kashi)
1/2 cup natural peanut butter (I just used regular PB)
1/2 cup packed brown sugar
1/2 cup light corn syrup
1 teaspoon vanilla
1/4 tsp salt

Toast peanuts, pumpkin seeds, oats, cereal in oven at 200F for 15 min then pour in a large bowl with dried fruit

Whisk the peanut butter, brown sugar, light corn syrup and salt in a medium microwavable bowl and heat on high until mixture is bubbling, about 1 to 2 minutes. (I actually did this over the stove top over medium heat because the microwave tends to dry things out)

Pour peanut butter/sugar mixture into the large bowl and mix thoroughly

Press the mixture into a 9 x 13-inch baking pan coated with cooking spray. (If mixture is sticky, use a bit of cooking spray on your hands or coat a piece of wax paper with cooking spray and use the paper to help you press the mixture into the pan.) I don't use cooking spray because that stuff freaks me out for some reason, but I found that lining the pan with aluminum was the best because parchment moves around too much)

Let bars cool for 1 hour before cutting into bars.

Makes about 16 bars.

barsgranola (6)

Thursday, December 4, 2008

Billy's Vanilla Vanilla Cupcakes

cupcakebillyvanillavanilla (4)

These were by far the best vanilla cupcakes I've ever made. I originally saw these on Martha. There's something about her and how she talks to her guests that annoys me, but when cupcakes are being made, how can I not watch? During the segment, I noticed that Martha likes to turn her machine up to a higher speed and aerate the batter for a little while (a long while to me). Other than Dories Perfect party cake, I've never done that. Maybe that's why I have bouts of over/undermixing, a perfect combination.. that is if you want something with a weird texture. Luckily, the problem is only mostly in white cakes and sometimes muffins (but I'm getting better!). These were the first vanilla cupcakes I've made in a really long time. I was having so many failed attempts that I decided bake stuff that wouldn't yet again be thrown away. After seeing Clara's vanilla cupcakes (actually.. lemon cupcakes), she totally convinced me into baking cupcakes again. Plus, her progress picks were totally tempting me! I actually made these weeks ago, but didn't have time to write about them til now.. when I really should be studying for final exams!

cupcakebillyvanillavanilla

8 hours later, I wouldn't say these were still amazing, but considering all the other times I made vanilla cupcakes, these were still the best. It's crazy how the texture changed from nice and fluffy to dense and slight crumbly.. WHY!?!? Even though I didn`t get to cream the butter, sugar and eggs (my favourite part), reverse creaming definitely produces a more tender, fluffy and airy crumb. Too bad these cupcakes weren't able to retain their cake mix-like texture hours later. As for the frosting, there was no way I was taking the icing sugar route and make Billy's vanilla frosting.. well sort of. I used the left over frosting from the DB challenge (my icing sugar-SMBC frosting duo). I'm definitely making these cupcakes again, but try it with more milk to hopefully keep them moist.

cupcakebillyvanillavanilla (2)

Billy's Vanilla Vanilla Cupcakes

Makes about 30 cupcakes.
1 3/4 cups cake flour, not self-rising
1 1/4 cups unbleached all-purpose flour
2 cups sugar (I used 1.5 cups)
1 tablespoon baking powder
3/4 teaspoon salt
1 cup (2 sticks) unsalted butter, cut into 1-inch cubes
4 large eggs
1 cup whole milk (I added 2 extra tablespoons of milk because some said these cupcakes were dry)
1 teaspoon pure vanilla extract

1. Preheat oven to 325 degrees. Line cupcake pans with paper liners; set aside. In the bowl of an electric mixer fitted with the paddle attachment, combine flours, sugar, baking powder, and salt; mix on low speed until combined. Add butter, mixing until just coated with flour.
2. In a large glass measuring cup, whisk together eggs, milk, and vanilla. With mixer on medium speed, add wet ingredients in 3 parts, scraping down sides of bowl before each addition; beat until ingredients are incorporated but do not overbeat.
3. Divide batter evenly among liners, filling about 2/3 full. Bake, rotating pan halfway through, until a cake tester inserted in the center comes out clean, 15 minutes (17 to 20 minutes. )
4. Transfer to a wire rack to cool completely. Repeat process with remaining batter. Once cupcakes have cooled, use a small offset spatula to frost tops of each cupcake. Decorate with sprinkles, if desired. Serve at room temperature.

LinkWithin

Related Posts with Thumbnails