 The August 2009 Daring Bakers' challenge was hosted by Angela of A Spoonful
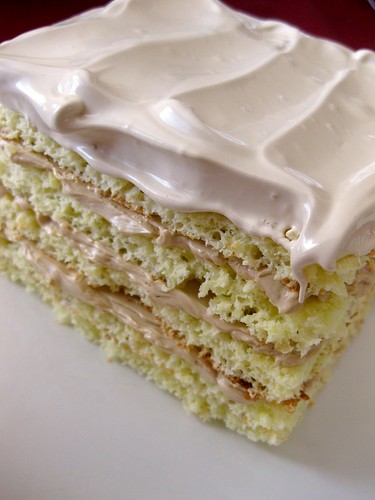
of Sugar and Lorraine of Not Quite Nigella. They chose the spectacular Dobos
Torte based on a recipe from Rick Rodgers' cookbook Kaffeehaus: Exquisite
Desserts from the Classic Caffés of Vienna, Budapest, and Prague.
5 layer sponge
Frosting: Coffee Buttercream
Made: Yesterday morning. A rush job I'm not so proud of as you can see with the coarse texture.
Recipe
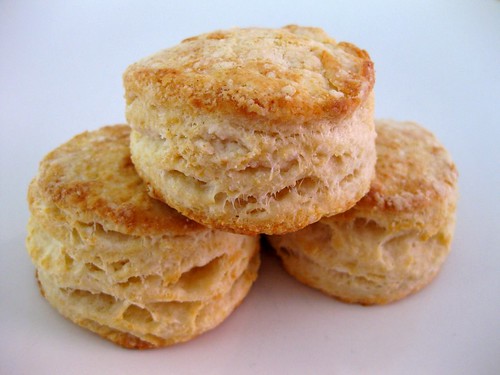 The day it was 40C (104F) outside, I had the sudden urge to bake biscuits... the kind of recipe that requires the oven to be preheated to 425F! I don't even like biscuits, but when I want to bake something, I have to or else it drives me crazy. These were so much fun because everything is done by hand. I made easy drop biscuits before, but I've never attempted buttermilk biscuits because I was afraid they wouldn't get those flaky layers or rise. These were inspired by Em and Kelly (who offers really great tips for getting those perfect layers and height). I used the recipe from Chris Kimball because I had all the ingredients available except that I subbed the shortening for butter. It's probably me, but the last time I made banana bread with shortening to see if there was a difference in texture with butter, it sort of had a meat aftertaste. Since these are not flavoured, I didn't want beef tasting biscuits...gross!
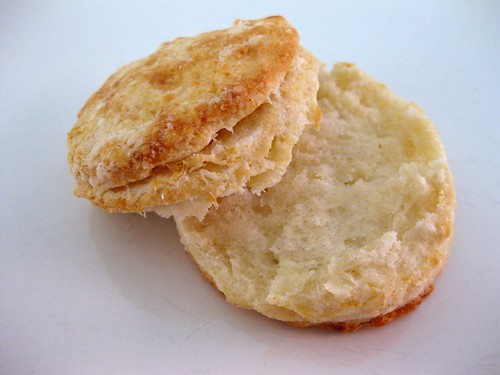
I was pretty pleased with the rise, but the texture wasn't as soft as I would have liked. I think it was my fault for over working the dough though. I wanted those layers so badly that I folded and patted the dough down more than I should have. Next time, I'm going to buy some lard so I can try Em's recipe. Overall, I would say that these were a success because my brother who I usually have to beg to try a cookie, brownie or cupcake had 4 of these!
Baking Powder Biscuits
Chris Kimball
If you do not have buttermilk, you can substitute regular sweet milk as indicated below. For extra height, let the cut biscuits sit on the baking sheet for 10 minutes before baking.
2 cups flour
1/4 teaspoon salt
2 teaspoons baking powder
1/2 teaspoon baking soda
4 tablespoons chilled butter
3 tablespoons chilled vegetable shortening (I used butter)
2/3 to 3/4 cup buttermilk
(I just used my fingers to rub the butter in and skipped the food processor)
Heat oven to 425 degrees. Combine the flour, salt, baking powder, and baking soda in the bowl of a food processor. Process for 2 seconds to mix.
Add the butter, cut into 1-tablespoon bits, to the flour and pulse 6 times for one second each. Add shortening and pulse another 5 times or until mixture looks like coarse meal (the flour should take on a slightly yellowish hue from the butter).
Place mixture into a large bowl. Using a rubber spatula, fold mixture together while adding buttermilk in a very thin stream. When mixture starts to hold together, press the dough with the side of the spatula. Note that you may use a little more or less than the 2/3-cup of buttermilk called for in this recipe.
Turn onto a floured surface and roll out dough very gently to a thickness of 1/2 inch. (I patted the dough down and folded it over a few times)
Use a biscuit cutter to cut the biscuits and then place on a cookie sheet. Bake in the preheated oven for about 10 minutes, turning the sheet after 5 minutes in the oven.
Makes 10 thick 2 3/4-inch biscuits or 16 2-inch biscuits.
SWEET-MILK VARIATION
Substitute milk for buttermilk, add 3 teaspoons cream of tartar, and reduce baking powder to 1 teaspoon.
 This week's creamiest lime turned lemon cream is definitely one of my favourite TWDs! As usual, I skipped the crust, but I was actually considering making one this time. It wasn't until I tasted the cream when I decided that it wasn't going to be shared with anything. I was enjoying it plain with blueberries (which were originally placed to hide the mark I made with my finger because I was a little anxious to taste it). The food processor is key for such a luscious filling. That and the 2 sticks + 2 tbsps of butter! I reduced it drastically, using only the 2 tbsps. Even though 2 tbsp is very little, it made the filling slightly richer and a little more special so I wouldn't omit it entirely. The best part about this recipe is you can adjust the butter/richness to your taste without screwing it up.
Thanks to Linda of Tender Crumb for choosing this week's recipe! You can find the recipe on her blog or in Dorie's book. Don't forget to check out the TWD blogroll!
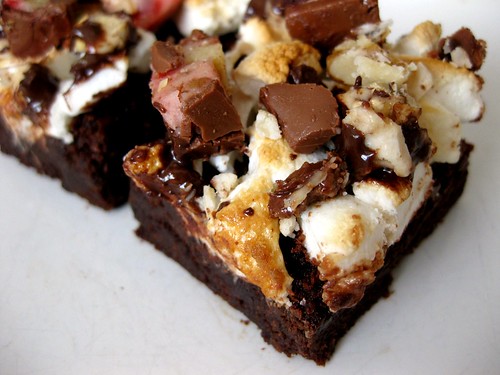 A while ago, Sees Candies kindly sent me 1lb of assorted chocolates. I absolutely loved their toffee crisps. They were so addicting! Initially I was going to bake cupcakes with a chocolate surprise in the centre. On second thought, I realized there would probably be sinkage and gooeyness from raw batter so that was out of the question. Soggy cake really grosses me out so I went with something where I wouldn't have to bake the chocolate. Ingrid inspired me to dress up my 'plain' low fat fudgy brownies so I topped them off with marshmallows and broiled it until it got toasty. Then I added chopped up See's chocolates. Some people are opposed to add ins when it comes to brownies and I'm usually one of them, but this was a fun twist. I really liked the combination of the chocolate chunks, marshmallows and fudgy base because of all the different textures. Plus, when it comes to assorted chocolates, I'm always curious about what they all taste like and have the urge to take a bite out of each of them. By chopping them up into smaller pieces, I can try more flavours at once!
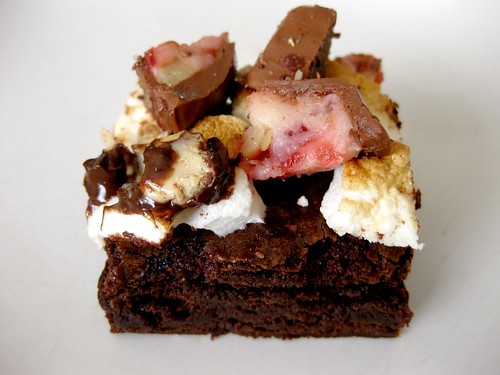 Low Fat Fudgy Brownies
Adapted from Cooks Illustrated
3/4 cup (3.75 oz) all-purpose flour
1/3 cup Dutch-processed cocoa powder
1/2 t baking powder
1/4 t salt
2 oz bittersweet chocolate, chopped
2 T unsalted butter
2 T low-fat sour cream
1 T chocolate syrup
2 t vanilla
1 egg
1 egg white (I omitted)
1 cup sugar
1/2 tsp instant coffee granules (I added)
enough marshmallows to scatter the top
chopped up chocolates
Adjust oven rack to middle position and preheat to 350.
Fold 2, 12-inch pieces foil lengthwise so each measures 7 inches wide. Fit sheets into 8-inch square pan, pushing foil into corners and up sides of pan (to help remove brownies--optional).
Spray foil or pan with cooking spray.
Whisk dry ingredients together.
Melt bittersweet chocolate and butter in large bowl over a double boiler until smooth.
(This is the part I changed: Add sugar and mix until slightly melted. It will look grainy because there is so little liquid. Add sour cream, syrup, vanilla and whisk, add egg and whisk, fold in dry ingredients until combined)
(The original directions tell you to: whisk in sour cream, syrup, vanilla, eggs, and sugar. Fold in dry ingredients until combined.)
Bake until slightly puffed and toothpick inserted in center comes out with a few sticky crumbs attached, 20-25 min.
Scatter marshmallows on top of brownie base and broil until they get toasty/melty. This happens quickly so keep an eye on the oven.
Remove from oven and scatter chopped up chocolates on top. You can press some of them down into the melted marshmallows so they don't fall off when being cut.
Cool completely in pan on wire rack.
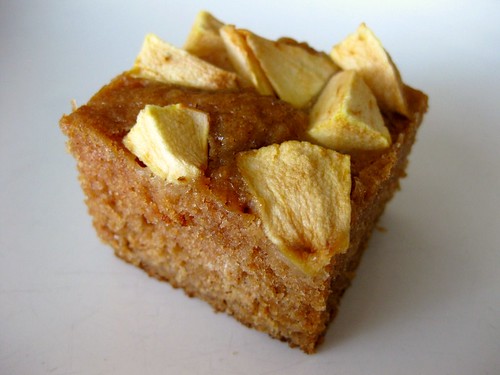 This week's recipe was a simple one bowl recipe.. the kind that always gives me the most stress because I can't just dump ingredients in a bowl. Unlike the creaming recipes where there is always a set sequence of cream the butter with sugar, adding the eggs one at a time... there are just so many ways to mix a one bowler. Should the sugar be whisked with the wet or the dry? Should the egg be whisked with the sugar first? Or could all the wet ingredients be whisked together at the same time? What really produces the best texture? That is why I tend to avoid one bowlers because as much as I would love to try all the different techniques, I'm not really up for trying 5 different versions of the same recipe.
Anyway...I made half the recipe, baked in a loaf pan to get more height and used brown sugar (2/3 cup instead of 1 to cut down on sweetness) instead of white. Since I don't usually like sugar glazes, I added the apples on top for a little decoration and to make it a little easier to photograph (because I can't make brown bars look pretty). These were more cake-like that bar-like and because of the medley of spices, no one would eat more than a piece. I thought it was ok, but needed more apple flavour. I don't know if adding more apple sauce would work though because that might just make things too gummy.
Thanks to Karen of Something Sweet by Karen for choosing this week's recipe! You can find the recipe on her blog or in Dorie's book. Don't forget to check out the TWD blogroll!
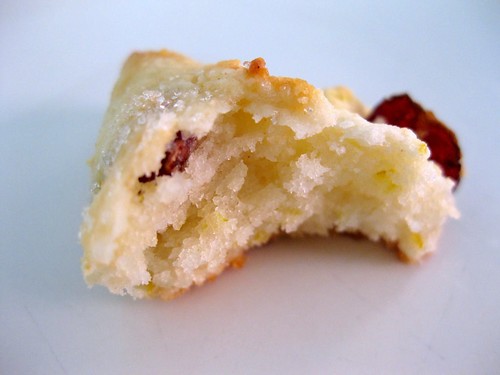
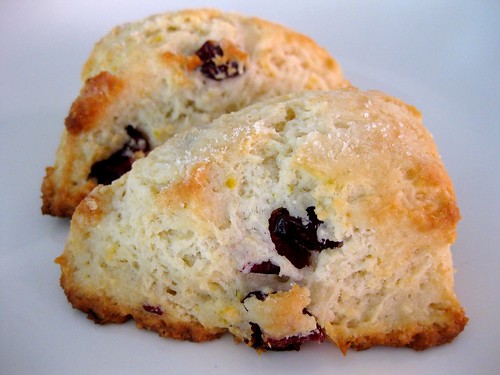 I'm not generally a huge scone fan except for maybe cream scones. I mean, how can something made with butter and cream not be melt-in-your-mouth tender?! This time I went with a recipe that's a little lighter, but still pretty rich. Using CI's blueberry scone recipe, I substituted the blueberries for craisins and doubled the lemon zest. To further enhance the lemon flavour, I used Dorie's tip to rub the zest with the sugar. CI's directions tell you to grate frozen butter, but I skipped that step because I don't like cleaning the box grater with bits of greasy butter stuck inside. I know they say it's the trick and I would totally do it if it made a huge difference, but I don't think the texture of these suffered. As long as it's still pebbly with pea size chunks and you don't rub the cold butter into the flour completely until it's a uniform mixture, they should be fine. And... sometimes I actually do like to keep it simple! Overall, these were really fluffy and soft. Best of all they were still moist the next day, but needed to be toasted to bring back those addicting crispy edges.
I actually made this recipe last year after my England trip when I was searching for a recipe just like the yummy scones from Harrods. I saw one posted on the internet, but seeing as there isn't that much butter and is made entirely of milk makes me wonder if they will be soft and fluffy.
Lemon Cranberry Scones
Cook's Illustrated
It is important to work the dough as little as possible—work quickly and knead and fold the dough only the number of times called for. The butter should be frozen solid before grating. In hot or humid environments, chill the flour mixture and workbowls before use. While the recipe calls for 2 whole sticks of butter, only 10 tablespoons are actually used (see step 1). If fresh berries are unavailable, an equal amount of frozen berries (do not defrost) can be substituted. An equal amount of raspberries, blackberries, or strawberries can be used in place of the blueberries. Cut larger berries into 1/4- to 1/2-inch pieces before incorporating. Refrigerate or freeze leftover scones, wrapped in foil, in an airtight container. To serve, remove foil and place scones on a baking sheet in a 375-degree oven. Heat until warmed through and recrisped, 8 to 10 minutes if refrigerated, 16 to 20 minutes if frozen. See final step for information on making the scone dough in advance.
16 tablespoons unsalted butter, frozen whole (see note above)
1 1/2 cups blueberries, fresh, about 7 1/2 ounces, picked over (see note) (I used 1 cup craisins)
1/2 cup whole milk
1/2 cup sour cream
2 cups (10 oz) unbleached all-purpose flour, plus additional all-purpose flour, for work surface
1/2 cup sugar, plus 1 tablespoon sugar, for sprinkling (3 1/2 ounces)
2 teaspoons baking powder
1/4 teaspoon baking soda
1/2 teaspoon table salt
1 teaspoon lemon zest, grated (I used 2 tsp)
Directions
1. Adjust oven rack to middle position and heat oven to 425 degrees. Score and remove half of wrapper from each stick of frozen butter. Grate butter and place grated butter in freezer until needed. Melt 2 tablespoons of remaining ungrated butter and set aside. Save remaining 6 tablespoons butter for another use. Place blueberries in freezer until needed.
2. Whisk together milk and sour cream in medium bowl; refrigerate until needed. Whisk flour, 1/2 cup sugar, baking powder, baking soda, salt, and lemon zest in medium bowl. Add frozen butter to flour mixture and toss with fingers until thoroughly coated.
3. Add milk mixture to flour mixture; fold with spatula until just combined. With rubber spatula, transfer dough to liberally floured work surface. Dust surface of dough with flour; with floured hands, knead dough 6 to 8 times, until it just holds together in ragged ball, adding flour as needed to prevent sticking.
4. Roll dough into approximate 12-inch square. Fold dough into thirds like a business letter, using bench scraper or metal spatula to release dough if it sticks to countertop. Lift short ends of dough and fold into thirds again to form approximate 4-inch square. Transfer dough to plate lightly dusted with flour and chill in freezer 5 minutes
5. Transfer dough to floured work surface and roll into approximate 12-inch square again. Sprinkle blueberries evenly over surface of dough, then press down so they are slightly embedded in dough. Using bench scraper or thin metal spatula, loosen dough from work surface. Roll dough, pressing to form tight log. Lay seam-side down and press log into 12 by 4-inch rectangle. Using sharp, floured knife, cut rectangle crosswise into 4 equal rectangles. Cut each rectangle diagonally to form 2 triangles and transfer to parchment-lined baking sheet.
6. Brush tops with melted butter and sprinkle with remaining tablespoon sugar. Bake until tops and bottoms are golden brown, 18 to 25 minutes. Transfer to wire rack and let cool 10 minutes before serving.
7. To Make Ahead: After placing the scones on the baking sheet, either refrigerate them overnight or freeze. When ready to bake, for refrigerated scones, heat oven to 425 degrees and follow directions in step 6. For frozen scones, heat oven to 375 degrees, follow directions in step 6, and extend cooking time to 25 to 30 minutes.
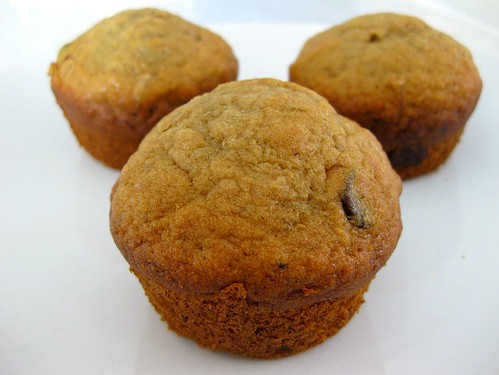 After seeing these muffins on Cassie's blog, I knew I had to make them except that I sort of didn't. When I bake, I usually start gathering stuff while the butter is being creamed. Even though this can lead to a little bit of scrambling, I feel like I'm saving time. Anyway, instead of measuring 1 1/2 cups of flour, I ended up measuring 2 cups by mistake. The baking soda and salt were already mixed in so I just went with it. Normally I wouldn't, but seeing as there was 1 1/2 cups of banana, there should be no dryness issues. I also creamed the butter so maybe these aren't really the Baked muffins anymore, but they were still good! The texture was definitely lighter than banana bread with the creaming. I think it would make a good banana cake because it was tender yet sturdy. The coffee wasn't strong, but it's probably because of the extra 1/2 cup of flour I added by mistake. I'll have to make the Baked version next time and premeasure instead of reading the ingredients off my laptop as the butter is being creamed.
Where did all the chocolate chips go?!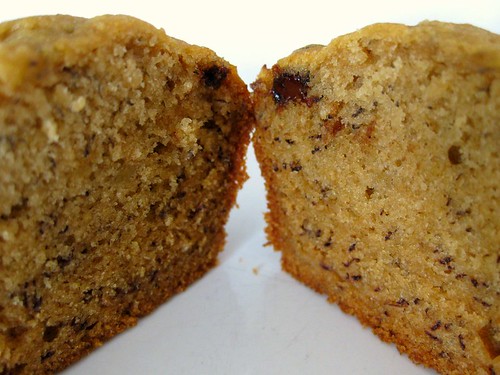
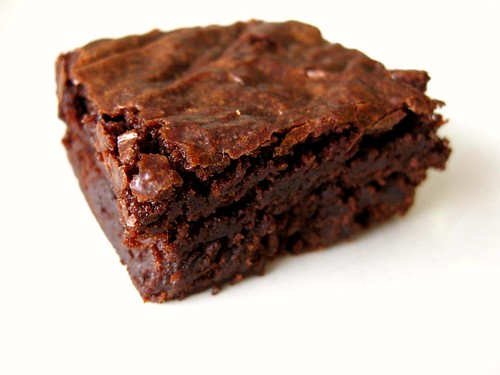 A lower fat fudgy brownie that actually tastes good exists!! This was just too exciting because I don't usually like regular brownies. They're just too rich for me, but most low fat brownies come off tasting like cardboard and have a weird texture. Finding the right recipe was going to be difficult, but once again, Cook's Illustrated came to the rescue. They managed to lower the fat just enough without skimping on flavour. I adapted their low fat fudgy brownies by removing the extra egg white, adding instant coffee and following King Arthur's directions to get that crust I love so much. I like it better without the extra egg white because I think lightens the texture up too much. You won't get quite the density, heaviness (or greasiness) of a full fat brownie...obviously since these contain a fraction of the amount of fat, but you won't feel cheated on flavour and texture either. The best part was the surprise reaction I got from my friends and family after I told them the brownie was low fat.
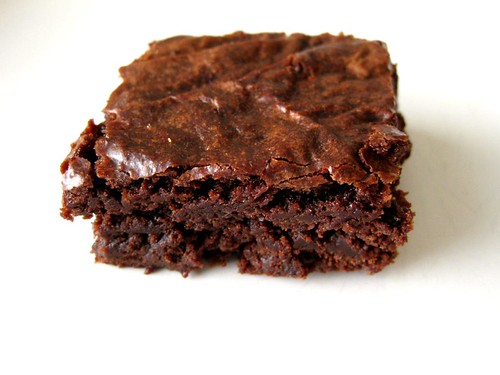
I had to be careful not to overbake these because they are lower in fat. It's just as important not to underbake them either or the texture might end up being gummy and you'll feel like you're eating goo. These are ready when the center looks slightly puffed and a toothpick inserted into the center has sticky crumbs attached. If the toothpick comes out clean, then they'll be overdone and dry. You also have to make sure you don't overmeasure the flour or else they will be dry and lose its fudginess. I will definitely be making these again!
Low Fat Fudgy Brownies
Adapted from Cooks Illustrated
3/4 cup (3.75 oz) all-purpose flour
1/3 cup Dutch-processed cocoa powder
1/2 t baking powder
1/4 t salt
2 oz bittersweet chocolate, chopped
2 T unsalted butter
2 T low-fat sour cream
1 T chocolate syrup
2 t vanilla
1 egg
1 egg white (I omitted)
1 cup sugar
1/2 tsp instant coffee granules (I added)
Adjust oven rack to middle position and preheat to 350.
Fold 2, 12-inch pieces foil lengthwise so each measures 7 inches wide. Fit sheets into 8-inch square pan, pushing foil into corners and up sides of pan (to help remove brownies--optional).
Spray foil or pan with cooking spray.
Whisk dry ingredients together.
Melt bittersweet chocolate and butter in large bowl over a double boiler until smooth.
(This is the part I changed: Add sugar and mix until slightly melted. It will look grainy because there is so little liquid. Add sour cream, syrup, vanilla and whisk, add egg and whisk, fold in dry ingredients until combined)
(The original directions tell you to: whisk in sour cream, syrup, vanilla, eggs, and sugar. Fold in dry ingredients until combined.)
Bake until slightly puffed and toothpick inserted in center comes out with a few sticky crumbs attached, 20-25 min.
Cool completely on wire rack.
 The best part about bundt cakes is you never really have to decorate them because they're so pretty by themselves... that is, unless if they stick because then you have something that's a little tricky to fix. This was the first time I've ever had a cake stick on me. I knew something was wrong when the cake wouldn't budge as I was wiggling the pan around before turning it over. This was actually a pretty scary moment because the thought of having to dig my fingers down the sides and try to pry it out didn't sound too fun. Luckily, with enough shaking and jiggling around, the cake was loose enough so that I could turn it upside down. A few pieces remained stuck on the pan, but at least it came out in one piece!

This was really moist and so tender that it literally melted in my mouth. I had to retoast it because it was a little mushy. The banana flavour was good, but not as strong as I would have liked. I wish I loved this as much as everyone else seemed to on the P&Q, but I think I'm just not a banana cake person even though weirdly enough I love banana bread. I didn't like the banana cake recipes from Sky High or Chris Kimball either because they were also too sweet and a little mushy. I guess I'll just stick with banana bread, especially the Silver Palate recipe with its strong banana flavour and sturdy yet tender crumb. There's also less fat, which is always a plus!
Thanks so much to Mary of Food Librarian for choosing this recipe! You can find the recipe on her blog or in Dorie's book. Don't forget to check out the TWD blogroll!