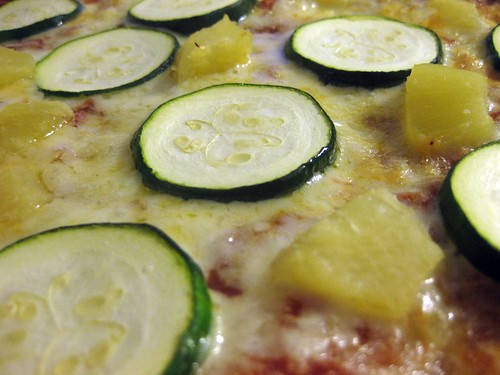
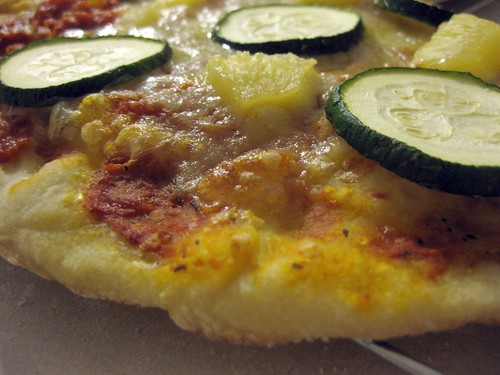
 Would I dare miss another round of DB.. NO! I'll admit, I was really close to skipping another month, but the guilt was starting to build. Plus, there really shouldn't be an excuse.. I mean, we only have a month to complete the challege. I remember not too long ago when I couldn't believe that people who joined DB weren't completing their challenges. I even volunteered to check blogs for those who weren't participating... oh my, how things have turned around. I guess it's a good thing I didn't end up becoming a blog checker for incomplete DB challenges or it would have been just a tad embarassing. Since I had the slightest urge to skip yet another month of DB until the very last minute, I didn't think of any cool toppings. With nothing except for zuchinni and canned pineapple, I just had to use both. I guess if I was going for something different, leftover pumpkin puree could do, but that would just be nasty.. at least I think.
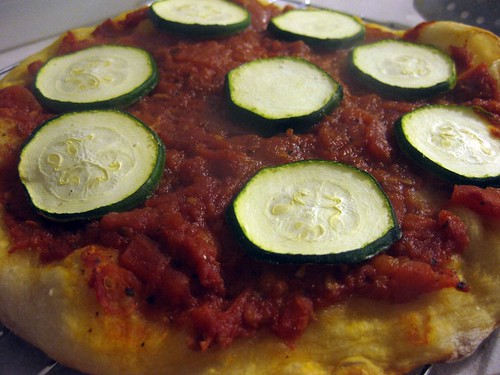
This was the second time I made pizza dough, but it was really different from the first time. I prefer how the dough in this recipe rests in the fridge overnight. That meant I wouldn't spend the day wondering how much longer it would take the yeast to work or poke at it every so often. I made my own pizza sauce using a can of diced tomatoes, some crushed garlic, basil and sugar.
Tossing the dough, that sounded like fun and it was except that I didn't exactly do it. I wanted to, but just as I slipped the dough over my knuckles and that in itself was extremely difficult to do, the dough was stretching.. a lot! Maybe there was too much liquid, but this was sticky and stretchy. There was no way, this could make it without tearing. Realistically, I don't think it was even possible to toss it at all because of how quickly it was stretching.
I only have one pizza pan, so I decided to bake one using a nine inch cake pan. That way I could have one thin and one thick crust pizza. Both were good, but if you haven't noticed, I forgot the cheese on the thick crust. Yep, that's what happens when you're in a rush. Sorry for the bad pictures, but I was trying to get these taken before my battery died on me. Thanks to Rosa for such a fun challenge. I think next time I make pizza dough, I'm going to try and find a food processor type recipe. It would totally save me 5 minutes of freaking out while the KA bounces around the counter and makes funny noises, which I have to admit is the slightest bit heartbreaking. I can't imagine what would happen if my standing mixer broke down on me. I guess I'll just have to run over to costco and get that professional one that is even bigger than the artisan!
Rosa included a gluten free version too!
Original recipe taken from “The Bread Baker’s Apprentice” by Peter Reinhart.
Makes 6 pizza crusts (about 9-12 inches/23-30 cm in diameter).
Ingredients:
4 1/2 Cups (20 1/4 ounces/607.5 g) Unbleached high-gluten (%14) bread flour or all purpose flour, chilled - FOR GF: 4 ½ cups GF Flour Blend with xanthan gum or 1 cup brown rice flour, 1 cup corn flour, 1 cup oat flour, 1 ½ cup arrowroot, potato or tapioca starch + 2 tsp xanthan or guar gum
1 3/4 Tsp Salt
1 Tsp Instant yeast - FOR GF use 2 tsp
1/4 Cup (2 ounces/60g) Olive oil or vegetable oil (both optional, but it’s better with)
1 3/4 Cups (14 ounces/420g or 420ml) Water, ice cold (40° F/4.5° C)
1 Tb sugar - FOR GF use agave syrup
Semolina/durum flour or cornmeal for dusting
DAY ONE
Method:
1. Mix together the flour, salt and instant yeast in a big bowl (or in the bowl of your stand mixer).
2. Add the oil, sugar and cold water and mix well (with the help of a large wooden spoon or with the paddle attachment, on low speed) in order to form a sticky ball of dough. On a clean surface, knead for about 5-7 minutes, until the dough is smooth and the ingredients are homogeneously distributed. If it is too wet, add a little flour (not too much, though) and if it is too dry add 1 or 2 teaspoons extra water.
NOTE: If you are using an electric mixer, switch to the dough hook and mix on medium speed for the same amount of time.The dough should clear the sides of the bowl but stick to the bottom of the bowl. If the dough is too wet, sprinkle in a little more flour, so that it clears the sides. If, on the contrary, it clears the bottom of the bowl, dribble in a teaspoon or two of cold water.
The finished dough should be springy, elastic, and sticky, not just tacky, and register 50°-55° F/10°-13° C.
Or
2. FOR GF: Add the oil, sugar or agave syrup and cold water, then mix well (with the help of a large wooden spoon or with the paddle attachment, on low speed) in order to form a sticky ball of dough.
3. Flour a work surface or counter. Line a jelly pan with baking paper/parchment. Lightly oil the paper.
4. With the help of a metal or plastic dough scraper, cut the dough into 6 equal pieces (or larger if you want to make larger pizzas).
NOTE: To avoid the dough from sticking to the scraper, dip the scraper into water between cuts.
5. Sprinkle some flour over the dough. Make sure your hands are dry and then flour them. Gently round each piece into a ball.
NOTE: If the dough sticks to your hands, then dip your hands into the flour again.
6. Transfer the dough balls to the lined jelly pan and mist them generously with spray oil. Slip the pan into plastic bag or enclose in plastic food wrap.
7. Put the pan into the refrigerator and let the dough rest overnight or for up to thee days.
NOTE: You can store the dough balls in a zippered freezer bag if you want to save some of the dough for any future baking. In that case, pour some oil(a few tablespooons only) in a medium bowl and dip each dough ball into the oil, so that it is completely covered in oil. Then put each ball into a separate bag. Store the bags in the freezer for no longer than 3 months. The day before you plan to make pizza, remember to transfer the dough balls from the freezer to the refrigerator.
DAY TWO
8. On the day you plan to eat pizza, exactly 2 hours before you make it, remove the desired number of dough balls from the refrigerator. Dust the counter with flour and spray lightly with oil. Place the dough balls on a floured surface and sprinkle them with flour. Dust your hands with flour and delicately press the dough into disks about 1/2 inch/1.3 cm thick and 5 inches/12.7 cm in diameter. Sprinkle with flour and mist with oil. Loosely cover the dough rounds with plastic wrap and then allow to rest for 2 hours.
Or
8. FOR GF: On the day you plan to eat pizza, exactly 2 hours before you make it, remove the number of desired dough balls from the refrigerator. Place on a sheet of parchment paper and sprinkle with a gluten free flour. Delicately press the dough into disks about ½ inch/1.3 cm thick and 5 inches/12.7 cm in diameter. Sprinkle the dough with flour, mist it again with spray oil. Lightly cover the dough round with a sheet of parchment paper and allow to rest for 2 hours.
9. At least 45 minutes before making the pizza, place a baking stone on the lower third of the oven. Preheat the oven as hot as possible (500° F/260° C).
NOTE: If you do not have a baking stone, then use the back of a jelly pan. Do not preheat the pan.
10. Generously sprinkle the back of a jelly pan with semolina/durum flour or cornmeal. Flour your hands (palms, backs and knuckles). Take 1 piece of dough by lifting it with a pastry scraper. Lay the dough across your fists in a very delicate way and carefully stretch it by bouncing it in a circular motion on your hands, and by giving it a little stretch with each bounce. Once the dough has expanded outward, move to a full toss.
Or
10. FOR GF: Press the dough into the shape you want (about 9-12 inches/23-30 cm in diameter - for a 6 ounces/180g piece of dough).
NOTE: Make only one pizza at a time.
During the tossing process, if the dough tends to stick to your hands, lay it down on the floured counter and reflour your hands, then continue the tossing and shaping.
In case you would be having trouble tossing the dough or if the dough never wants to expand and always springs back, let it rest for approximately 5-20 minutes in order for the gluten to relax fully,then try again.
You can also resort to using a rolling pin, although it isn’t as effective as the toss method.
11. When the dough has the shape you want (about 9-12 inches/23-30 cm in diameter - for a 6 ounces/180g piece of dough), place it on the back of the jelly pan, making sure there is enough semolina/durum flour or cornmeal to allow it to slide and not stick to the pan.
Or
11. FOR GF: Lightly top it with sweet or savory toppings of your choice.
12. Lightly top it with sweet or savory toppings of your choice.
Or
12. FOR GF: Place the garnished pizza on the parchment paper onto the stone in the oven or bake directly on the jelly pan. Close the door and bake for about 5-8 minutes.
NOTE: Remember that the best pizzas are topped not too generously. No more than 3 or 4 toppings (including sauce and cheese) are sufficient.
13. Slide the garnished pizza onto the stone in the oven or bake directly on the jelly pan. Close the door and bake for abour 5-8 minutes.
Or
13. FOR GF: Follow the notes for this step.
NOTE: After 2 minutes baking, take a peek. For an even baking, rotate 180°.
If the top gets done before the bottom, you will need to move the stone or jelly pane to a lower shelf before the next round. On the contrary, if the bottom crisps before the cheese caramelizes, then you will need to raise the stone or jelly.
14. Take the pizza out of the oven and transfer it to a cutting board or your plate. In order to allow the cheese to set a little, wait 3-5 minutes before slicing or serving.

 So my cupcakes didn't exactly turnout looking too pretty and I would rather not show it in its entirety because it's a little sad when the domed tops dome the other way. Anyways, it feels great to be baking ahead of schedule.. haha. I was definitely excited for this recipe and it wasn't because of the obvious reason.. chocolate. It's because chocolate cake recipes are generally more forgiving when it comes to overmixing and dryness. White cakes can be so disappointing in the texture department. They use just as much, if not more butter and not to mention cake flour! Could it be the cocoa powder, the buttermilk or the boiling water that most recipes use? Sometimes I'm just tempted to make a chocolate cake recipe minus the chocolate to see if I can get a moist and tender white cake.
Other than the sinking, the recipe turned out pretty well, although I wish there was just a bit more chocolate flavour. Some TWDers mentioned that their cupcakes turned out dry and how it might have to do with proper flour measurements. What really is one cup of flour anyway? I guess it can be whatever you want it to be.. 5oz (CI), 4.8oz (Dorie). For me, I spoon the flour into a measuring cup then give it a little shake at the midway point to settle the flour (which I think you're actually not supposed to do) and then spoon the rest in with a final sweep using a knife. That usually gets me at or just a little off 5oz. I really should be using a scale, but sometimes I get a little lazy, which is suprising since I'm always worrying (a little too much!) about stuff like proper measurement, mixing times, baking times and temperatures. I won't even tell you how I reacted when I found out that my liquid measuring cups were all different! You would think that at least within a brand that they'd be consistent, but that is not the case with my Pyrex ones.

My cupcakes ended up pretty moist, but I pulled them out a lot earlier than the 22-25 mins suggested. Then again, I still got 12 cupcakes using my large sized cookie scoop after halving the recipe. Most cupcake recipes I make finish in my oven at 17 minutes, but these were done at 14. Once the wonderful smell of chocolate started to come out of the oven, I checked the cupcakes with a toothpick and pulled them out when there were a few (maybe 2) mini moist crumbs attached. I ate one while it was still burning hot and it was really nice and fluffy. As they cooled, the texture totally changed and it became more brownie like, which is still good, but fluffy is better! I guess I should've left them in for the usual 17 minutes I normally do, since they remoistened so much.
Thanks to Clara of I Heart Food 4 Thought for choosing this recipe, which can be found on her blog and in Dorie Greenspan's Baking: From my Home to Yours. Don't forget to checkout the TWD Blogroll!
Ok, this is a little embarassing and I couldn't stop laughing when I saw them, but this is what happened.

 I can't believe it's been almost two weeks since my last post, since I've been checking other super cool blogs and since I've last baked!! I missed Tuesday, so I guess Thursday will count as my TWD. It has definitely been a crazy two weeks with test after test and assignment after assignment. The year always starts off slow and then bam! you're hit with a million things to do and wishing for just one more hour... then I would be able cram a whole new chapter in... haha. I've pretty much been loading up my brain for each test and then letting it all out after to make room for the next round of stuff. Today, I ended my day with my 6-9pm lab after having finished 4 tests and 3 assigments since last Thursday and even though I didn't get home until 10, I just had to bake. Nothing could stop me, not even a very sleep deprived brain and body. Other than chocolate chip cookies, I couldn't think of anything easier to whip up. Maybe it's been a little too long, but something did not turn out right with my chocolate chip cookies, the dough was definitely stiffer than usual.. where did all the liquid go? I only poured 3/4 cups of melted butter with the flour, surely it didn't all get absorbed! Anyway.. maybe I'll save the rest for a chocolate chip cookie post, back to the pumpkin muffins!!
I actually made these on the Friday before the real TWD so technically I haven't been 2 weeks without baking, but it sure feels like it. I've never had pumpkin in any dessert other than pumpkin pie and honestly, I've never been able to eat more than a bite of pumpkin pie without feeling a little (actually a lot) grossed out. To be fair, those pies were storebought and I'm sure nothing beats homemade.. as with practically every baked good. As usual, I cut down the recipe to half except when it came to adding the pumpkin, I totally forgot and added the full amount! I guess I'll never know what these are supposed to really taste like unless I made them again and based on my experience with these, I don't think I should ever bake with pumpkin again. These were incrediably addicting, espeically with the blend of spices that let the pumpkin flavour come through. These have definitely climbed up the to top of my ranks for muffins, but I should probably try out the original recipe for a real test.
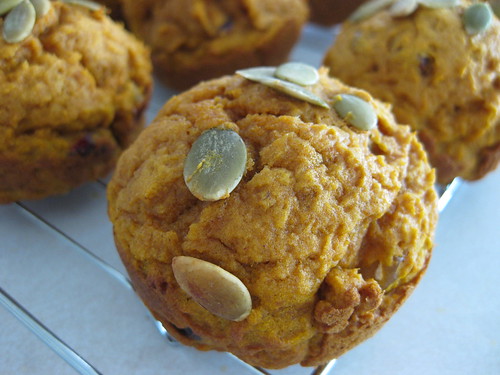
When I first got into baking, muffins were definitely one of the first things I wanted to try. Maybe it was those cute muffin liners or the ease with which those food network chefs make folding 'look' (not true for me.. I'm scared of folding!). I can't tell you how many muffins went into the trash before I almost wanted to quit altogether and forget about muffins. Then there was the whole debate about what is a muffin. Are they just a cupcake in disguise or really something healthier and breakfasty type? I used to be obsessed with reading recipes and looking at the different ratios of liquid to flour to fat and it actually killed me whenever I found muffin recipes that were really just cupcake recipes with a few blueberries thrown in. It's kind of the same thing I have with the whole bundt cake, pound cake issue. Sometimes I get so overly caught up with little details it literally takes me forever to decide on what to bake... I know.. how crazy! That's why I have TWD to help me decide every week.
These were actually the first muffins I made using the creaming method and is definitely how I'm making all my muffins from now on. The whole 'is it a muffin, it is a cupcake' issue may not be totally resolved, but I'm definitely leaning towards towards the light and fluffy style over the dense kind. Plus, who doesn't like watching the beautiful butter-sugar-egg emulsion! These were actually still a little dense, with double the amount of pumpkin that went in, but there was also a fluffy quality to it. Actually, they were kind of creamy in a melt in your mouth kind of way with a super tender crumb.. a little unexpected but I loved it! I wasn't too sure about raisins, but many TWDers mentioned that they really enjoyed it so I added half raisins and half craisins. When I cut a muffin in half I couldn't believe my eyes.. was there a flour pocket in the middle!! No, it was just flour stuck to the raisins I premixed with the flour to avoid folding altogether with my never gentle technique. phew!

Thanks to Kelly of Sounding of my Barbaric Gulp for choosing this recipe, which can be found on her blog and in Dorie Greenspan's Baking: From my Home to Yours. Don't forget to checkout the TWD Blogroll!
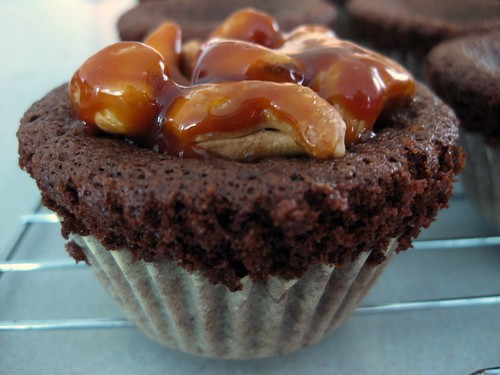 I've decided to make the most of my Monday and Wednesday mornings before classes and spend it baking. Not only do I get to start the day with something yummy, but also with something I love doing! Instead of waiting until the last minute like last week, I started on the caramel topped peanut cake on Wednesday morning so I could bring it to school. This was really exciting because I'm always talking about my baking, but never actually shared (other than to family or neighbours) because I am afraid it's not good enough and would like to be spared the embarassment. After several rounds of TWD, I would have to say that my confidence has definitely improved.
I didn't have peanuts, so I stirred in cashews into my first non-soupy caramal sauce. I made a cupcake style version of the full recipe (that's right, I actually made the full recipe) and was anticipating with great excitment as I watched the cake rise in the oven (yes, I actually do that). Something about seeing the batter transform from a liquidy smooth batter into an actual cake makes me feel good. Anyway, despite my high hopes, something must have gone terribly wrong because these did not taste right. First, the texture was weird (springy and chewier than my ususal chocolate cakes) and the flavour was off. It had the slightest soapy aftertaste and no chocolate flavour. Could it be that I've been so used to halving my recipes that I halved the chocolate without knowing? I have no idea what went wrong, but with the clock ticking and batter still left in the bowl, I had to either bake and pray (secretly hoping that somehow only the batter on the top was messed up) or dump it out.
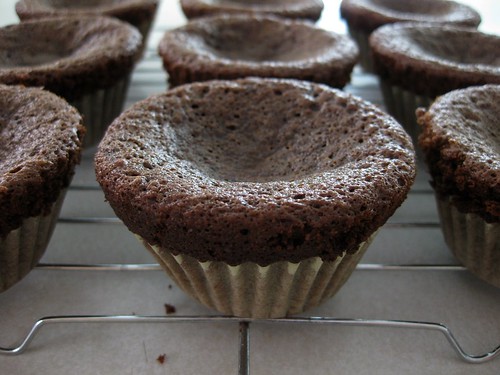
So what do you do when you're left with a chocolate batter that tastes like a regular cake with a hint of chocolate flavour? You add cocoa powder. There was no way I could incorporate cocoa without over mixing so I decided to turn the brownie cake into a cookie. Cookies seem to be a little more forgiving to overmixing. Plus, if anyone askes, these are supposed to be chewy cookies! Suprisingly, the cookie version turned out a lot better, but instead of leaving it there, I decided to turn them into whoppie pies! By the time I was all finished, it was running late so I had to leave without taking pictures of my completed cookie sandwiches. I got home and was left with nothing, not even a half whoppie pie to snap at! Overall, a not so good TWD turned out to be a lot of fun especially with the tranformation of the original brownie cake turned cookie turned whoppie pie.
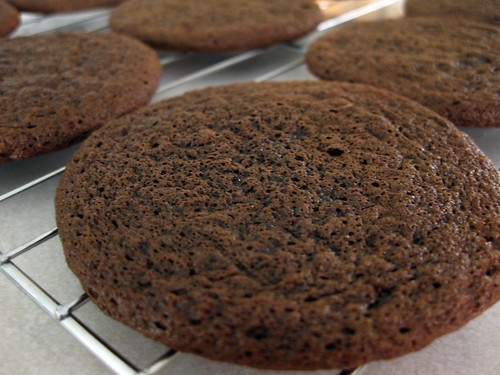
So these didn't exactly have the height of a normal whoppie pie with the extreme flattness of them.
Thanks to Tammy of Wee treats by Tammy for choosing this recipe, which can be found on her blog and in Dorie Greenspan's Baking: From my Home to Yours. Don't forget to checkout the TWD Blogroll!