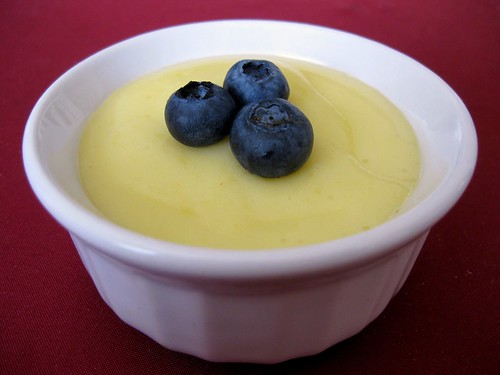
 This week's creamiest lime turned lemon cream is definitely one of my favourite TWDs! As usual, I skipped the crust, but I was actually considering making one this time. It wasn't until I tasted the cream when I decided that it wasn't going to be shared with anything. I was enjoying it plain with blueberries (which were originally placed to hide the mark I made with my finger because I was a little anxious to taste it). The food processor is key for such a luscious filling. That and the 2 sticks + 2 tbsps of butter! I reduced it drastically, using only the 2 tbsps. Even though 2 tbsp is very little, it made the filling slightly richer and a little more special so I wouldn't omit it entirely. The best part about this recipe is you can adjust the butter/richness to your taste without screwing it up.
Thanks to Linda of Tender Crumb for choosing this week's recipe! You can find the recipe on her blog or in Dorie's book. Don't forget to check out the TWD blogroll!
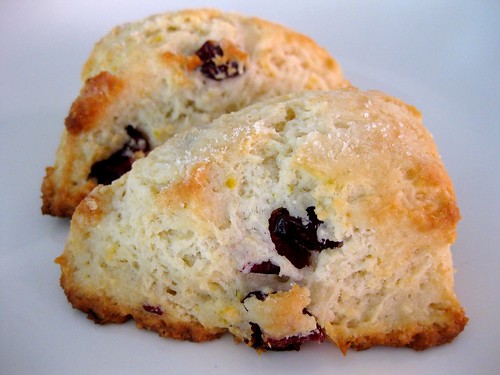 I'm not generally a huge scone fan except for maybe cream scones. I mean, how can something made with butter and cream not be melt-in-your-mouth tender?! This time I went with a recipe that's a little lighter, but still pretty rich. Using CI's blueberry scone recipe, I substituted the blueberries for craisins and doubled the lemon zest. To further enhance the lemon flavour, I used Dorie's tip to rub the zest with the sugar. CI's directions tell you to grate frozen butter, but I skipped that step because I don't like cleaning the box grater with bits of greasy butter stuck inside. I know they say it's the trick and I would totally do it if it made a huge difference, but I don't think the texture of these suffered. As long as it's still pebbly with pea size chunks and you don't rub the cold butter into the flour completely until it's a uniform mixture, they should be fine. And... sometimes I actually do like to keep it simple! Overall, these were really fluffy and soft. Best of all they were still moist the next day, but needed to be toasted to bring back those addicting crispy edges.
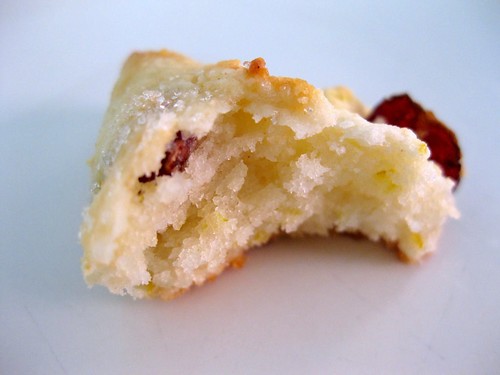
I actually made this recipe last year after my England trip when I was searching for a recipe just like the yummy scones from Harrods. I saw one posted on the internet, but seeing as there isn't that much butter and is made entirely of milk makes me wonder if they will be soft and fluffy.
Lemon Cranberry Scones
Cook's Illustrated
It is important to work the dough as little as possible—work quickly and knead and fold the dough only the number of times called for. The butter should be frozen solid before grating. In hot or humid environments, chill the flour mixture and workbowls before use. While the recipe calls for 2 whole sticks of butter, only 10 tablespoons are actually used (see step 1). If fresh berries are unavailable, an equal amount of frozen berries (do not defrost) can be substituted. An equal amount of raspberries, blackberries, or strawberries can be used in place of the blueberries. Cut larger berries into 1/4- to 1/2-inch pieces before incorporating. Refrigerate or freeze leftover scones, wrapped in foil, in an airtight container. To serve, remove foil and place scones on a baking sheet in a 375-degree oven. Heat until warmed through and recrisped, 8 to 10 minutes if refrigerated, 16 to 20 minutes if frozen. See final step for information on making the scone dough in advance.
16 tablespoons unsalted butter, frozen whole (see note above)
1 1/2 cups blueberries, fresh, about 7 1/2 ounces, picked over (see note) (I used 1 cup craisins)
1/2 cup whole milk
1/2 cup sour cream
2 cups (10 oz) unbleached all-purpose flour, plus additional all-purpose flour, for work surface
1/2 cup sugar, plus 1 tablespoon sugar, for sprinkling (3 1/2 ounces)
2 teaspoons baking powder
1/4 teaspoon baking soda
1/2 teaspoon table salt
1 teaspoon lemon zest, grated (I used 2 tsp)
Directions
1. Adjust oven rack to middle position and heat oven to 425 degrees. Score and remove half of wrapper from each stick of frozen butter. Grate butter and place grated butter in freezer until needed. Melt 2 tablespoons of remaining ungrated butter and set aside. Save remaining 6 tablespoons butter for another use. Place blueberries in freezer until needed.
2. Whisk together milk and sour cream in medium bowl; refrigerate until needed. Whisk flour, 1/2 cup sugar, baking powder, baking soda, salt, and lemon zest in medium bowl. Add frozen butter to flour mixture and toss with fingers until thoroughly coated.
3. Add milk mixture to flour mixture; fold with spatula until just combined. With rubber spatula, transfer dough to liberally floured work surface. Dust surface of dough with flour; with floured hands, knead dough 6 to 8 times, until it just holds together in ragged ball, adding flour as needed to prevent sticking.
4. Roll dough into approximate 12-inch square. Fold dough into thirds like a business letter, using bench scraper or metal spatula to release dough if it sticks to countertop. Lift short ends of dough and fold into thirds again to form approximate 4-inch square. Transfer dough to plate lightly dusted with flour and chill in freezer 5 minutes
5. Transfer dough to floured work surface and roll into approximate 12-inch square again. Sprinkle blueberries evenly over surface of dough, then press down so they are slightly embedded in dough. Using bench scraper or thin metal spatula, loosen dough from work surface. Roll dough, pressing to form tight log. Lay seam-side down and press log into 12 by 4-inch rectangle. Using sharp, floured knife, cut rectangle crosswise into 4 equal rectangles. Cut each rectangle diagonally to form 2 triangles and transfer to parchment-lined baking sheet.
6. Brush tops with melted butter and sprinkle with remaining tablespoon sugar. Bake until tops and bottoms are golden brown, 18 to 25 minutes. Transfer to wire rack and let cool 10 minutes before serving.
7. To Make Ahead: After placing the scones on the baking sheet, either refrigerate them overnight or freeze. When ready to bake, for refrigerated scones, heat oven to 425 degrees and follow directions in step 6. For frozen scones, heat oven to 375 degrees, follow directions in step 6, and extend cooking time to 25 to 30 minutes.
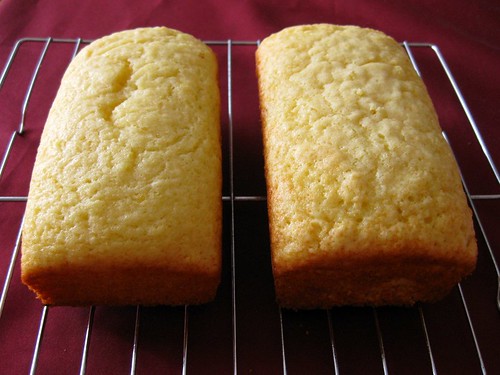 I've wanted to bake a French yogurt cake for the longest time, but never got to it because I couldn't decide which recipe to choose (how typical...haha). Every recipe I found called for folding in the oil in the last step, which seemed kind of different from most cake recipes (non yogurt). Could it be a crucial step to making yogurt cakes and provide some improvement in texture that can benefit other oil based cakes as well? I just couldn't resist making this cake the way it was written (loaf #1) as well as whisking the eggs and sugar and then whisking in the oil until they were completely combined (loaf #2) to see if there would be a difference. Luckily, this recipe was easy to divide in 3's so I made 1/3rd of the recipe for each mini loaf pan and weighed everything to be as fair as possible.
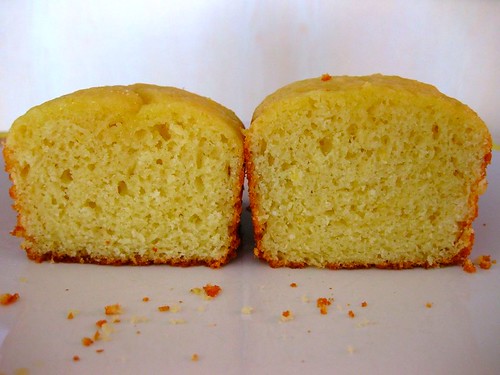
Left: folding in oil at end; Right: whisking in oil with eggs and sugar
Loaf #2 rose slightly higher and was more pebbly on the surface than loaf #1. Loaf #1 was also denser, chewier and greasier (almost like a Costco muffin kind of way) while loaf #2 was slightly more tender and ligher. Judging by the P&Q, I think I'm in the minority with this one because I wasn't too crazy about the French yogurt cake. It was a little too springy, dense and low fat tasting for me. I'll probably make the glaze next time to get the full effect and use the method for loaf #2 (whisk the oil in beforehand with the eggs and sugar). That way, we won't have to worry about overmixing or greasiness. I actually liked the cake a little better the next day flavourwise, however, the differences were even more noticeable and loaf #1 was drier and became even denser. I think it's so cool how the same amount of fat, but added differently can affect moistness and texture.
Thanks to Liliana of My Cookbook Addiction for choosing this recipe. The recipe can be found on her site and here. Don't forget to visit the TWD Blogroll!
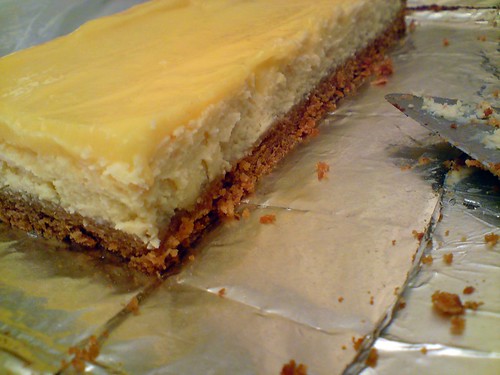 This week's TWD.. I haven't said that in a while! was perfect in time for the holidays. It wasn't very tall because I halved the recipe and baked it in a 9x9 square pan, but it was very creamy! Instead of using the springform, I used a 9x9 square pan so I could bake it in a waterbath without having leakage problems. I totally forgot about the waterbath though so that totally defeated the purpose of not using springform. I was in a huge rush to bake it and have it properly chilled because I decided the morning of Christmas eve that I would bring it over for dinner after seeing Nancy from the Dogs Eat the Crumbs do her informative post for TWD (I love how she looks for other sources when she bakes). Luckily, cheesecake isn't one of those desserts where I have to worry about the crumb changing from soft and fluffy to dense and dry within a couple or hours and can be just thrown in the fridge without messing up the texture. I've tried storing regular cakes wrapped in plastic on the counter overnight, fridge and freezer, but everytime it changes for the worse so I have to make cakes fresh unless if it's chocolate, which actually improves in flavour overtime without sacrificing texture. The whole 'crumb getting even tighter' in the freezer thing doesn't seem to work for me and neither does wrapping the cake before it is completely cool to seal in the texture because that just turns the cake wet and heavy.
Anyway, back to the cheesecake that my family raved about.. I was so excited! I replaced a block of cream cheese with the low fat kind because full fat cheesecake is a little too rich. Cheesecakes are the only kind of dessert that doesn't stress me out because they always turn out delicious no matter which recipe you use.. maybe except for hyper low fat variations. After making cheesecakes with a handmixer, stand mixer and the food processor, I would have to say that the food processor is the quickest and always ensures the smoothest texture. There's barely any scraping involved too! Originally, I wasn't going to make a topping and just serve it plain, the way cheesecakes should be in my opinion, but when I opened the oven door, it looked like something hit it.. badly because there were cracks (huge ones) everywhere! I decided to cover it up with lemon curd instead of whipped cream because we didn't exactly need anymore cream. I don't think I've had real lemon curd before because this was amazing! If this is what the filling is supposed to taste like in lemon meringue pie, then I might actually love it. I love how with each addition of fat (butter then heavy cream), it just gets yummier and more luscious!
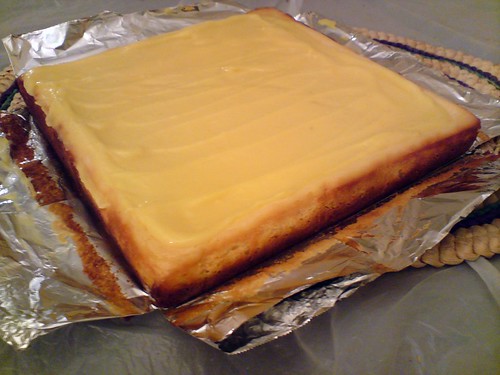
Thanks to Anne of Anne Strawberry for choosing this recipe, which can be found on her blog and in Dorie Greenspan's Baking: From my Home to Yours. Don't forget to checkout the TWD Blogroll!
Lemon Curd
Cook's Illustrated
1/3 cup juice from 2 lemons
2 large eggs plus 1 large egg yolk
1/2 cup (3 1/2 ounces) sugar
2 tablespoons unsalted butter, cut into 1/2-inch cubes and chilled
1 tablespoon heavy cream
1/4 teaspoon vanilla extract
Pinch salt
(I added 1/2 tsp of lemon zest for extra lemon flavour)
FOR THE LEMON CURD: While cheesecake bakes, heat lemon juice in small nonreactive saucepan over medium heat until hot but not boiling. Whisk eggs and yolk in medium nonreactive bowl; gradually whisk in sugar. Whisking constantly, slowly pour hot lemon juice into eggs, then return mixture to saucepan and cook over medium heat, stirring constantly with wooden spoon, until mixture registers 170 degrees on instant-read thermometer and is thick enough to cling to spoon, about 3 minutes. Immediately remove pan from heat and stir in cold butter until incorporated; stir in cream, vanilla, and salt, then pour curd through fine-mesh strainer into small nonreactive bowl. Cover surface of curd directly with plastic wrap; refrigerate until needed.

When I used to babysit, the kids' mom would buy pillsbury cut and slice cookies and bake them for us to eat. I kind of forgot what they taste like, but remember eating so many of those bunny printed cookies that I would feel a little sick. I came across Cafe Johnsonia where she made cut and slice lemon cookies. Since I still had that little bit of lemon left from my lemon bundt cake (yes.. that long ago) and I got to test out my new food processor, it was perfect. It may be hard to tell from my picture, but I made half lemon (right) and half lemon-orange-cornmeal (left). I definitely need to improve on picture taking. Most of the time, I have to take the same picture using different settings because there are so many, my hand is shaking or the lighting is all wrong! Anyway, the cornmeal actually added a nice crunch, but also roughness. The cookies were very flavourful and shortbread-like with more of a crunch, but I don't think I'll make them again. Maybe its because I don't like shortbread cookies in general, the absence of brown sugar or the missing glaze. From what I remember, the Pillsbury cookies had more a chew to them, like snickerdoodles or those Tim Horton's 'gourmet' cookies so I think they may be a different kind of slice-and-bake.
This is totally unrelated, but I'm excited for the Wilton cake decorating classes at Michaels I signed up for. Hopefully I can learn some much needed basic cake decorating skills! It amazes me how creative people are with decorating, plating and flavour combinations that I hope will come with time.
The recipe (yes, another CI one) can be found at Cafe Johnsonia, where there are amazing step by step instructions.
 Ever since I saw this post about the lemon bundt cake, it looked too delicious not to try. Before I try new recipes, I always do a search to make sure that it worked for others and where it is from because I've had too many bad experiences in the past with recipes that are way too advanced or just simply flopped. Luckily, this recipe received great reviews and is also from Cook's Illustrated, which is definitely a bonus. Before I even started on the cake, I had to get a bundt pan, but with so many designs it was hard to choose. In the end, I picked up the anniversary classic bundt pan, since there are only so many times I can bake a castle or a rose cake. Scanning over the recipe, the first thing that caught my eye was the 18 tablespoons of butter! I was planning on making half the recipe anyway, since that's what I usually do when I try new desserts. I decided that instead of using 9 tablespoons of butter for the halved recipe, I would just do 8 tablespoons. A one tablespoon reduction of butter may not seem much, but in the end, it all adds up! 1.5 flour/8 tablespoons of butter is my usual ratio for flour to butter anyway, any higher and the cake feels a little too rich. To prevent using more butter, I never grease my pans, but I do line it with parchment. I can't line a bundt pan, but this cake had enough butter that it fell out easily. My favourite part of the recipe was the use of freshly squeezed lemon juice and buttermilk. Since both ingredients help to tenderize cakes, it can be extremely helpful for an inexperienced baker like me, especially since this cake calls for all purpose flour.
  Its amazing how the addition of an egg can curdle the creamed butter and sugar, but when the speed is increased, the curdled mess transforms into the smoothest and fluffiest mixture. When the cake was done and finally cool, I couldn't wait to cut a slice and hope that the crumb was just as tight and tender as ones I have seen. I ate it plain with no glaze or icing sugar and was so moist and fluffy. This was definitely one of the better cakes I've made. Lemon Bundt CakeAdapted from Cook's Illustrated
Serves 12 to 14
Cake
3 lemons , zest grated and saved, then juiced for 3 tablespoons juice
3 cups unbleached all-purpose flour (15 ounces)
1 teaspoon baking powder
1/2 teaspoon baking soda
1 teaspoon table salt
1 teaspoon vanilla extract
3/4 cup low-fat buttermilk (preferably)
3 large eggs , at room temperature
1 large egg yolk , at room temperature
18 tablespoons unsalted butter (2 1/4 sticks), at room temperature (I used 16 tablespoons)
2 cups sugar (14 ounces)
Glaze
2 - 3 tablespoons fresh lemon juice (see note above)
1 tablespoon buttermilk
2 cups confectioners' sugar (8 ounces)
1. FOR THE CAKE: Adjust oven rack to lower-middle position; heat oven to 350 degrees. Spray 12-cup Bundt pan with nonstick baking spray with flour (alternatively, brush pan with mixture of 1 tablespoon flour and 1 tablespoon melted butter). Mince lemon zest to fine paste (you should have about 2 tablespoons). Combine zest and lemon juice in small bowl; set aside to soften, 10 to 15 minutes.
2. Whisk flour, baking powder, baking soda, and salt in large bowl. Combine lemon juice mixture, vanilla, and buttermilk in medium bowl. In small bowl, gently whisk eggs and yolk to combine. In standing mixer fitted with flat beater, cream butter and sugar at medium-high speed until pale and fluffy, about 3 minutes; scrape down sides of bowl with rubber spatula. Reduce to medium speed and add half of eggs, mixing until incorporated, about 15 seconds. Repeat with remaining eggs; scrape down bowl again. Reduce to low speed; add about one-third of flour mixture, followed by half of buttermilk mixture, mixing until just incorporated after each addition (about 5 seconds). Repeat using half of remaining flour mixture and all of remaining buttermilk mixture. Scrape bowl and add remaining flour mixture; mix at medium-low speed until batter is thoroughly combined, about 15 seconds. Remove bowl from mixer and fold batter once or twice with rubber spatula to incorporate any remaining flour. Scrape into prepared pan.
3. Bake until top is golden brown and wooden skewer or toothpick inserted into center comes out with no crumbs attached, 45 to 50 minutes.
4. FOR THE GLAZE: While cake is baking, whisk 2 tablespoons lemon juice, buttermilk, and confectioners' sugar until smooth, adding more lemon juice gradually as needed until glaze is thick but still pourable (mixture should leave faint trail across bottom of mixing bowl when drizzled from whisk). Cool cake in pan on wire rack set over baking sheet for 10 minutes, then invert cake directly onto rack. Pour half of glaze over warm cake and let cool for 1 hour; pour remaining glaze evenly over top of cake and continue to cool to room temperature, at least 2 hours. Cut into slices and serve.


